Kiroku User Guide
Welcome to Kiroku
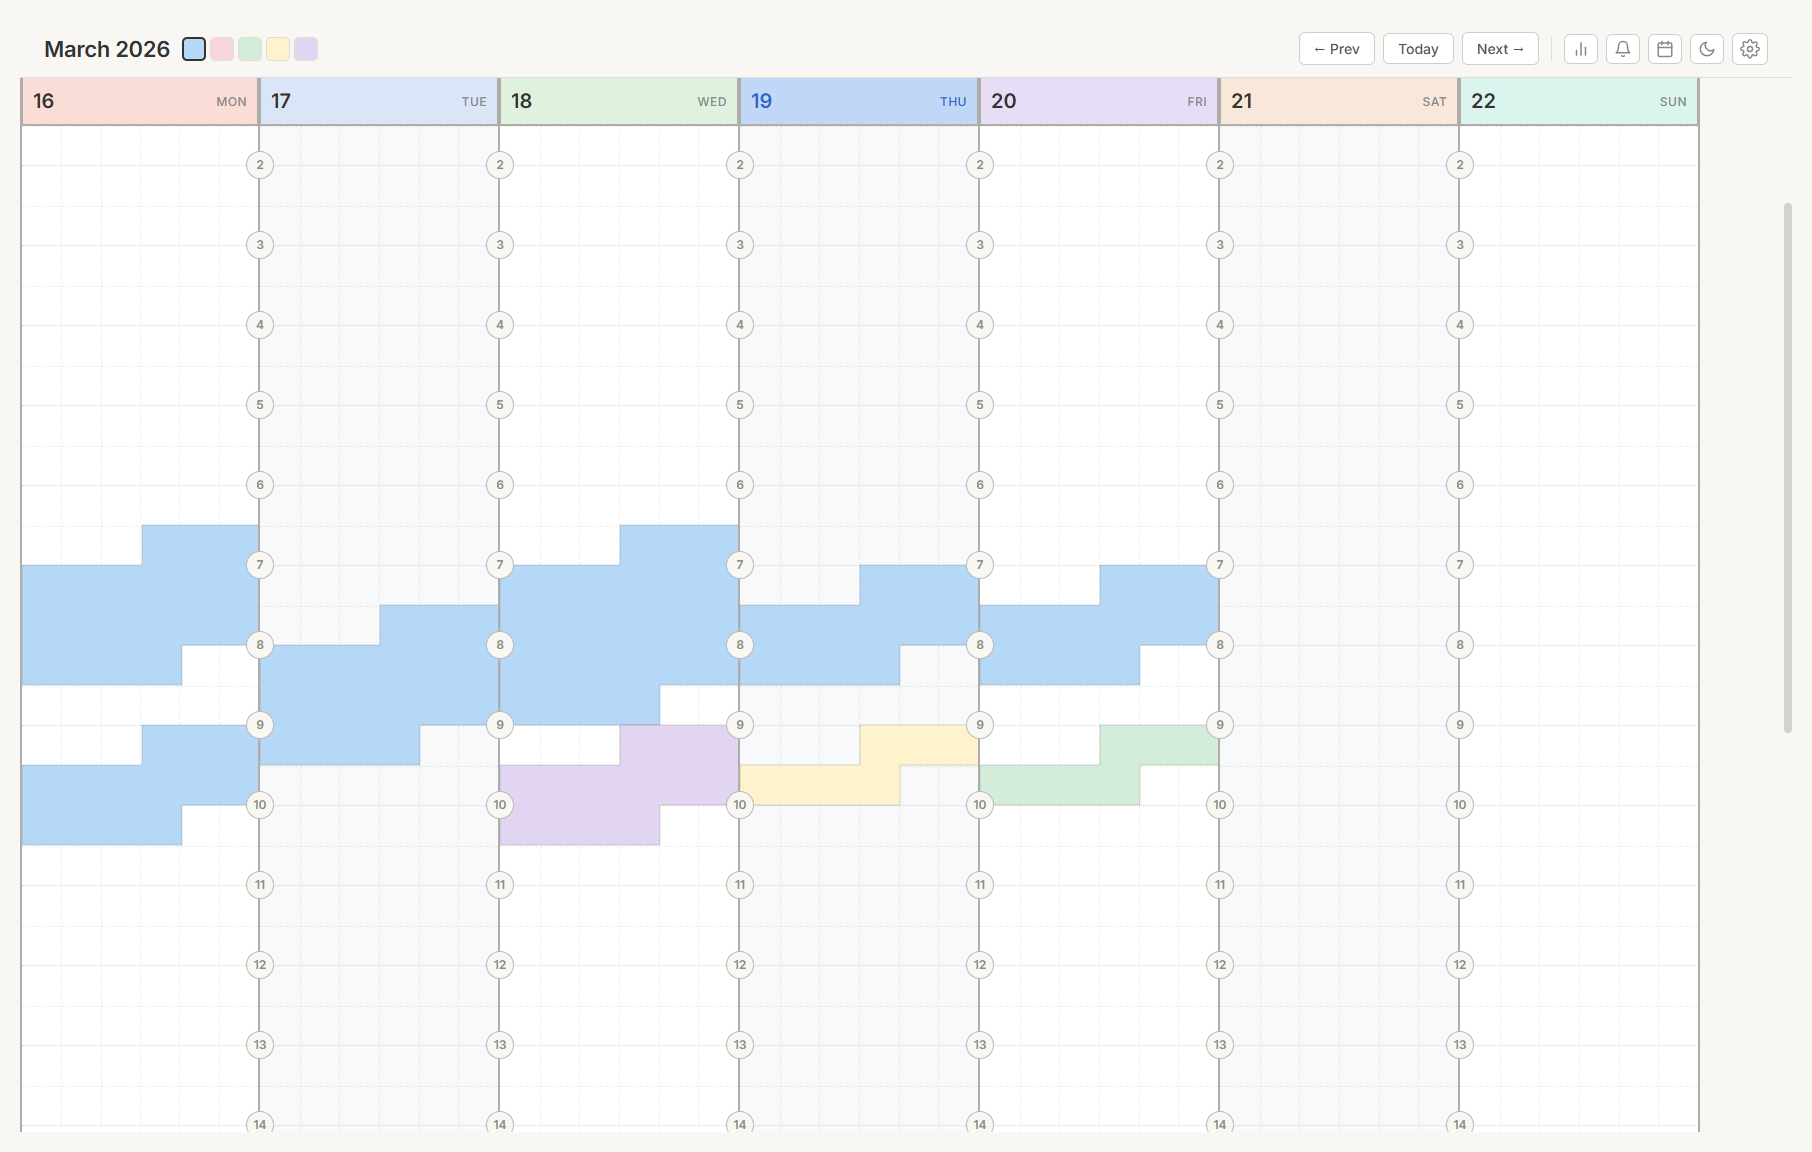
Kiroku is a visual weekly planner. Your week appears as a colorful grid — each column is a day, and each row is an hour. Create tasks by clicking and dragging directly on the grid.
Planner data is local by default. Sign in only when you want hosted sync, external capture, shared/admin features, or other account-backed services.
Table of Contents
- Sign-in options - The top bar - Create a task - Switch weeks - Choose a date range- View the daily summary
- Review the daily record and personal analytics
- Use the calendar view
- Write day notes
- Clear all tasks for a day
- Settings
- General
- Imports
- Culture
- Styles
- Overlay
- Days
- Tasks
- Colors
- Alerts
- Calendar
- Pomodoro
- Status
- Start a session - Add items to the queue - Open the command palette - Create a recurring task - Save a template - Real-time sync - Choose a presetGet started
Open Kiroku in your browser or the Windows desktop app. Your current week appears automatically.
To plan your first task:
- Click a colored task type button at the top of the screen (such as Work or Personal).
- Click and drag on any day column to draw a block of time.
- Release to create the task.
The task appears on the grid immediately. Hover over it to see its start time, end time, and duration.
Sign in and accounts
Planner data is local by default, so you can use Kiroku without any account. Sign in when you want hosted sync, external capture, or other account-backed features.
Sign-in options
The login page leads with OneCode, the fastest way into a hosted account. The other methods are listed right below it:
- OneCode — a generated two-word code (like
PRETTYBIRD) plus a password. No email, name, or personal info required. - Google — sign in with your Google account.
- Email — classic email and password, with email verification and password reset. Click Use email sign-in to switch to this view; Back to OneCode sign-in returns.
OneCode accounts
A OneCode account is built for privacy: you sign in without giving out any personal information — no email, no name, nothing. Your planner data stays in your browser, and the account exists only to identify you. When you want cloud sync and the full feature set, upgrade to a full account.
To create one:
- On the login page, click Don't have one? Create a OneCode.
- Kiroku immediately shows a suggested two-word code. Click the refresh button beside it to cycle suggestions until you find one you like.
- Choose a password (and confirm it), then click Use [your code].
- The confirmation screen shows your code one more time — write it down. Click I saved my code — continue to enter the planner.
You sign in with just the code and password. Codes are not case-sensitive, and spaces or dashes are ignored — pretty bird works the same as PRETTYBIRD.
OneCode accounts come with restrictions:
- Basic feature profile. OneCode accounts get the basic usage profile configured for the deployment. Cloud sync and most account-backed features are off — your planner data stays local to your browser until you upgrade.
- 14-day inactivity deletion. If you do not sign in for more than 14 days, the account and all of its data are deleted automatically. Signing in resets the clock.
- No password recovery. There is no email on file, so a lost password (or a lost code) can never be recovered. The account simply expires after 14 days.
- Failed-login lockout. More than five failed sign-in attempts locks the account for 1 hour. Another round of failures locks it for 2 hours, then 4, and so on up to 24 hours. A successful sign-in resets the lockout.
Upgrade a OneCode account
You can convert a OneCode account into a full account at any time and keep all of your data:
- Click the account icon in the top-right of the planner.
- The panel shows your OneCode and an Upgrade to a Full Account section.
- Enter an email address and a new password, then click Upgrade Account.
- Verify your email when the confirmation message arrives, then sign in with your email and password.
After upgrading, the OneCode sign-in is removed, the 14-day expiry no longer applies, and the account gains the regular feature set — including cloud sync — with password recovery available.
The main view
The top bar
The top bar contains navigation controls and quick-access buttons.
- Month and year. Displays the current month (such as "March 2026").
- Task type buttons. Colored buttons for each task category. The selected type has a glowing border. Hover over a button to see its name.
- Workspace switcher. A dropdown that appears when you have more than one workspace.
- Prev / Next arrows. Move one week backward or forward.
- Today. Return to the current week.
- Zoom level. Displays the current zoom percentage when not at 100%.
- Icon buttons. Quick access to Time Tracking, Start Day, End Day, Quick Capture, Voice Assistant, Journal, Daily Record, Search, Daily Summary, Queue, Calendar View, Theme, Settings, and account controls. Some buttons collapse or move on smaller screens.
Day columns
Each day has its own column with the following elements:
- Header. Shows the day number, month, and weekday (such as "19 Mar Wed"). Today's header is highlighted in blue. Holidays appear in red text when turned on. If a day has multiple holidays, the first is shown with a "+1" badge — hover to see all.
- Grid. Solid lines mark each hour. Dashed lines mark the half hour. Faint vertical lines help you position tasks precisely.
- Current time marker. A red highlight on today's column shows the current time. It updates automatically.
- Hour lines. Bold horizontal lines you can add in Settings to mark important times.
- Background colors. Columns alternate between two background colors. You can customize weekday and weekend colors separately.
Hour markers
Small numbered circles appear along the left edge of each column, one for each hour (0 through 23).
Click any marker to cycle through three states:
- Normal. A subtle circle with the hour number.
- Highlighted. A bold, filled circle that stands out.
- Hidden. The marker is not visible.
Notes and hours summary
Below each day's header:
- Total time. The total scheduled time for that day (such as "2 hours and 30 minutes"). If no tasks are scheduled, it reads "No tasks."
- Notes. A text area for quick notes about that day. Click to edit, and the notes save automatically when you click away or press Tab. Press Escape to discard changes.
Create, edit, and delete tasks
Create a task
- Click a task type button at the top of the screen.
- Click and hold on a day column where you want the task to begin.
- Drag up or down to set the duration. A colored preview appears as you drag.
- Release to place the task.
Tasks snap to 5-minute intervals. The minimum task duration is 5 minutes.
Resize a task
Move your pointer to the top or bottom edge of a task until the cursor changes. Click and drag to make the task longer or shorter.
Tasks snap to 5-minute intervals when resizing.
Move a task
Click and drag from the center of a task to reposition it.
Do any of the following:
- Change the time. Drag the task up or down within the same column.
- Change the day. Drag the task left or right to a different column.
The task saves to its new position when you release.
Add text to a task
- Double-click a task to open the editor.
- Type a label, meeting name, or any text you like.
- Do one of the following:
- Press Shift + Enter to add a new line.
- Press Escape to cancel without saving.
- Click Save or Cancel.
Text appears directly on the task block. Long text is truncated with an ellipsis.
Lock a task
Open a task and enable Lock schedule, type, and status when the task should stay fixed on the plan.
A locked task can still be opened so you can read its notes and other details, but Kiroku blocks changes to:
- Date.
- Start time.
- End time.
- Duration.
- Task type.
- Task status.
- Alert/task mode.
Locked tasks also cannot be moved or resized by dragging. To change a protected field, unlock the task first, make the change, then lock it again.
Duplicate a task
On touch layouts, tap a task to open its task sheet, then tap Duplicate. Kiroku creates a same-day copy shifted 30 minutes after the original task.
For repeating lunch, medication, school pickup, or another fixed task across the rest of a week, use Recurring tasks for the task itself or save a Day template if the whole day layout should repeat. The voice assistant can also duplicate a matching task across upcoming visible days when the profile has voice assistance enabled.
Delete a task
Do either of the following:
- Use the editor. Double-click the task, then click Delete. Confirm when prompted.
- Press and hold. Hold the pointer on a task for 3 seconds without moving. A confirmation dialog appears. If you move the pointer during the hold, the action is cancelled and the task is dragged instead.
The current time indicator
A red highlight appears on today's column showing the current time. It updates in real time and appears only on today's column.
Manage task types
Task types are categories with assigned colors. Every task belongs to one type. Kiroku includes five default types:
| Type | Color | Description |
|---|---|---|
| Work | Blue | Jobs, meetings, email, homework |
| Personal | Pink | Hobbies, reading, personal projects |
| Exercise | Green | Gym, running, sports, yoga |
| Errand | Yellow | Shopping, appointments, chores |
| Social | Purple | Social events, calls, gatherings |
To customize task types, go to Settings > Tasks.
You can rename any type, change its color, set its opacity, add new types, or delete types you no longer need. Opacity is saved with the task type, syncs with the rest of the planner data, and updates every task that uses that type. If tasks exist that use a type you delete, you are prompted to confirm before those tasks are removed.
View task details on hover
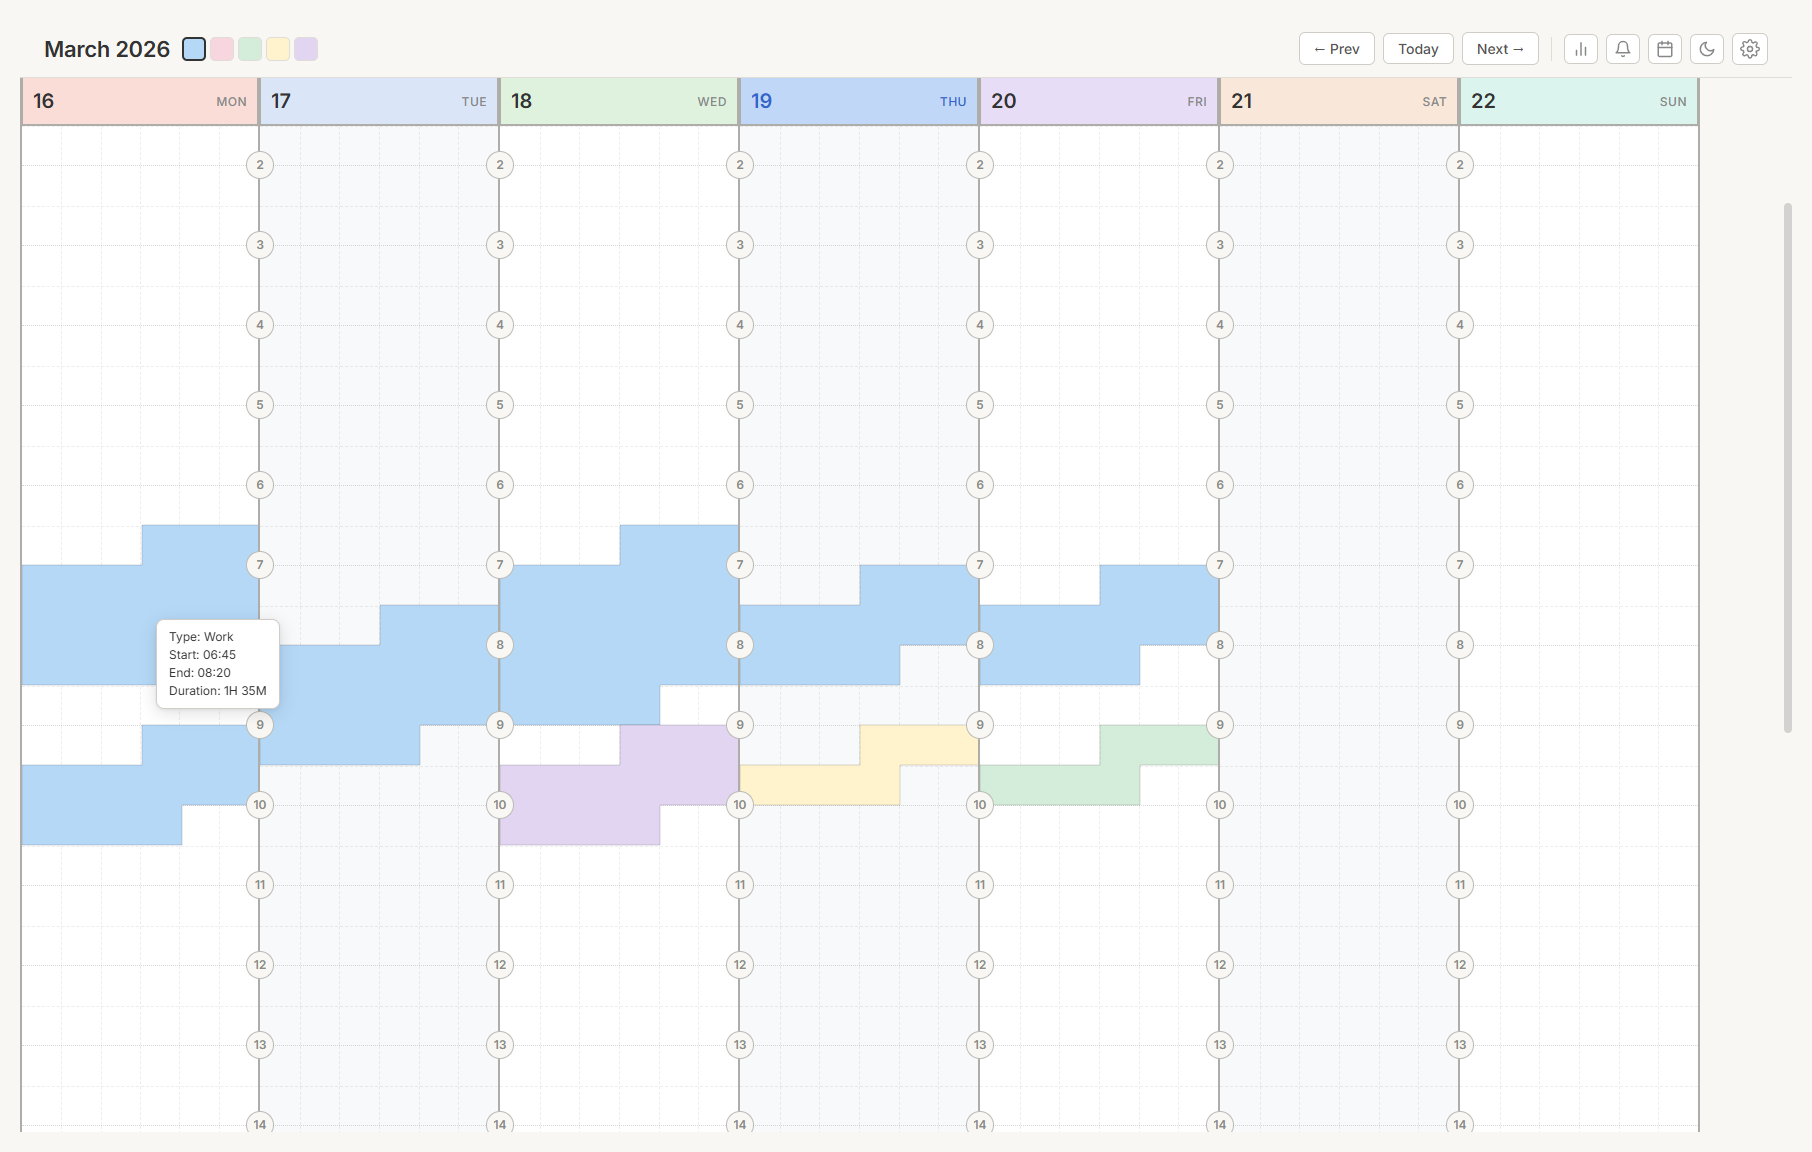
When you hover over a task, an info overlay appears with details about it.
The overlay can show:
| Field | Short format | Long format |
|---|---|---|
| Type | "Work" | "Work" |
| Start | "06:45" | "6:45 AM" |
| End | "08:20" | "8:20 AM" |
| Duration | "1H 35M" | "1 Hour 35 Min" |
| Text | "Team standup" | "Team standup" |
To customize which fields appear, the overlay position, time format, and hover delay, go to Settings > Overlay.
Navigate your schedule
Switch weeks
- Click Prev to go back one week.
- Click Next to go forward one week.
- Click Today to return to the current week.
The month and year in the top bar update as you navigate.
Zoom in and out
Hold Ctrl and scroll the mouse wheel to zoom. Five zoom levels are available:
| Zoom | Best for |
|---|---|
| 25% | Full-day overview |
| 50% | Busy day overview |
| 100% | Standard view |
| 200% | Precise task placement |
| 400% | Fine-tuning short tasks |
The zoom level appears in the top bar when not at 100%. The view remains centered on the area you are viewing.
Change theme
Click the theme icon in the top bar to cycle through the available application themes. The current theme is saved automatically.

Available themes include Light, Dark, Small, Small Light, Aurora, Charcoal, Canopy, and Harbor. Small and Small Light use compact 10pt monospace typography.
Track your time
Click the bar chart icon in the top bar to open Time Tracking.
Choose a date range
Use the From and To date pickers at the top. Click either to open a calendar. Use the arrows to change months. Click Today to set both dates to the current day.
If no tasks exist in the selected range, a message indicates this.
Click X to close.
View time breakdowns
For each task type with scheduled time in the date range, the following appears:
- The type name with its color.
- Total hours spent on that type.
- A proportional colored bar for visual comparison.
View daily timelines
Below the totals, each day is shown as a horizontal 24-hour timeline with colored bars at the actual times of your tasks.
- Hover over a bar to see its time range, duration, and text.
- Time markers appear at 6 AM, 9 AM, 12 PM, 3 PM, 6 PM, and 9 PM.
- Total time for each day appears on the right.
View the daily summary
Click the bell icon in the top bar.
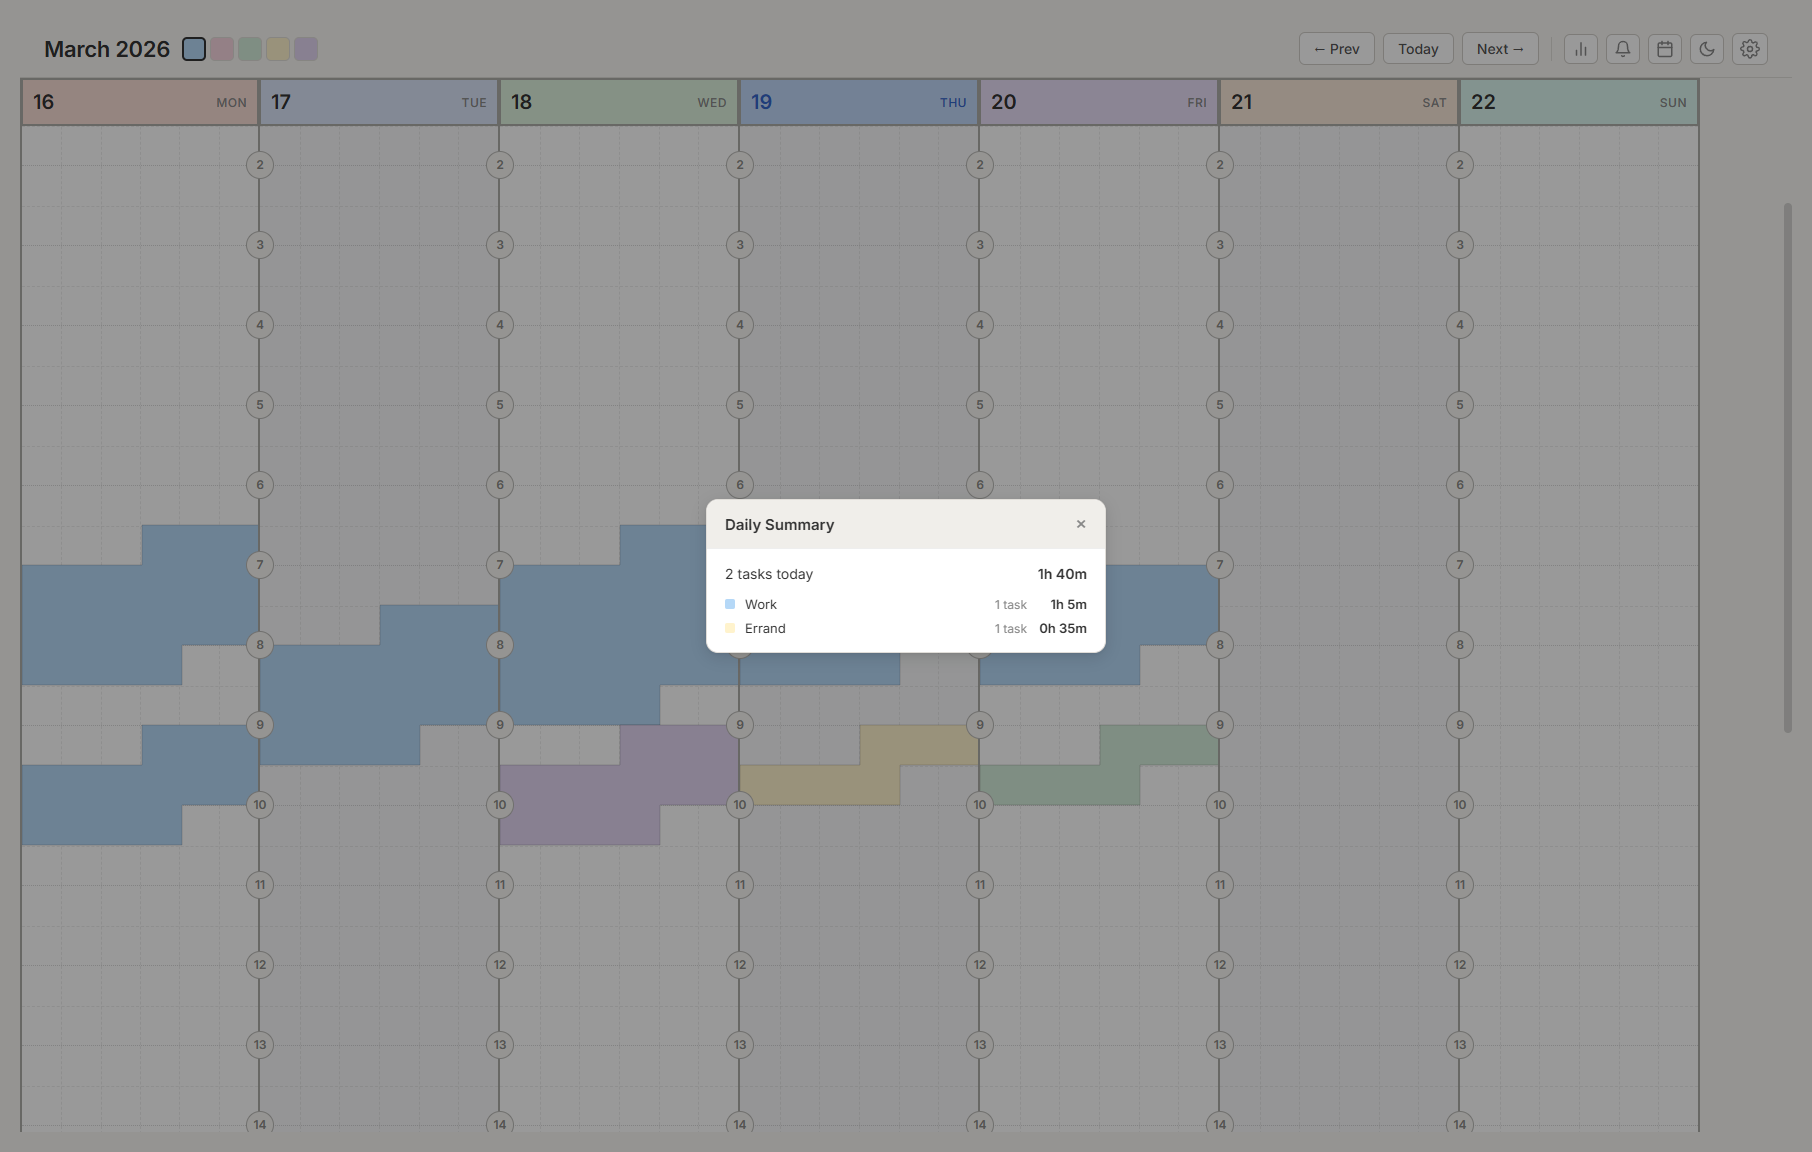
The daily summary shows:
- Total number of tasks and total time planned for today.
- A breakdown by task type (such as "3 Work tasks — 4 hours").
- Day notes, if any.
This is a read-only overview. Close it to make changes on the grid.
Review the daily record and personal analytics
Click the Daily Record icon in the top bar.
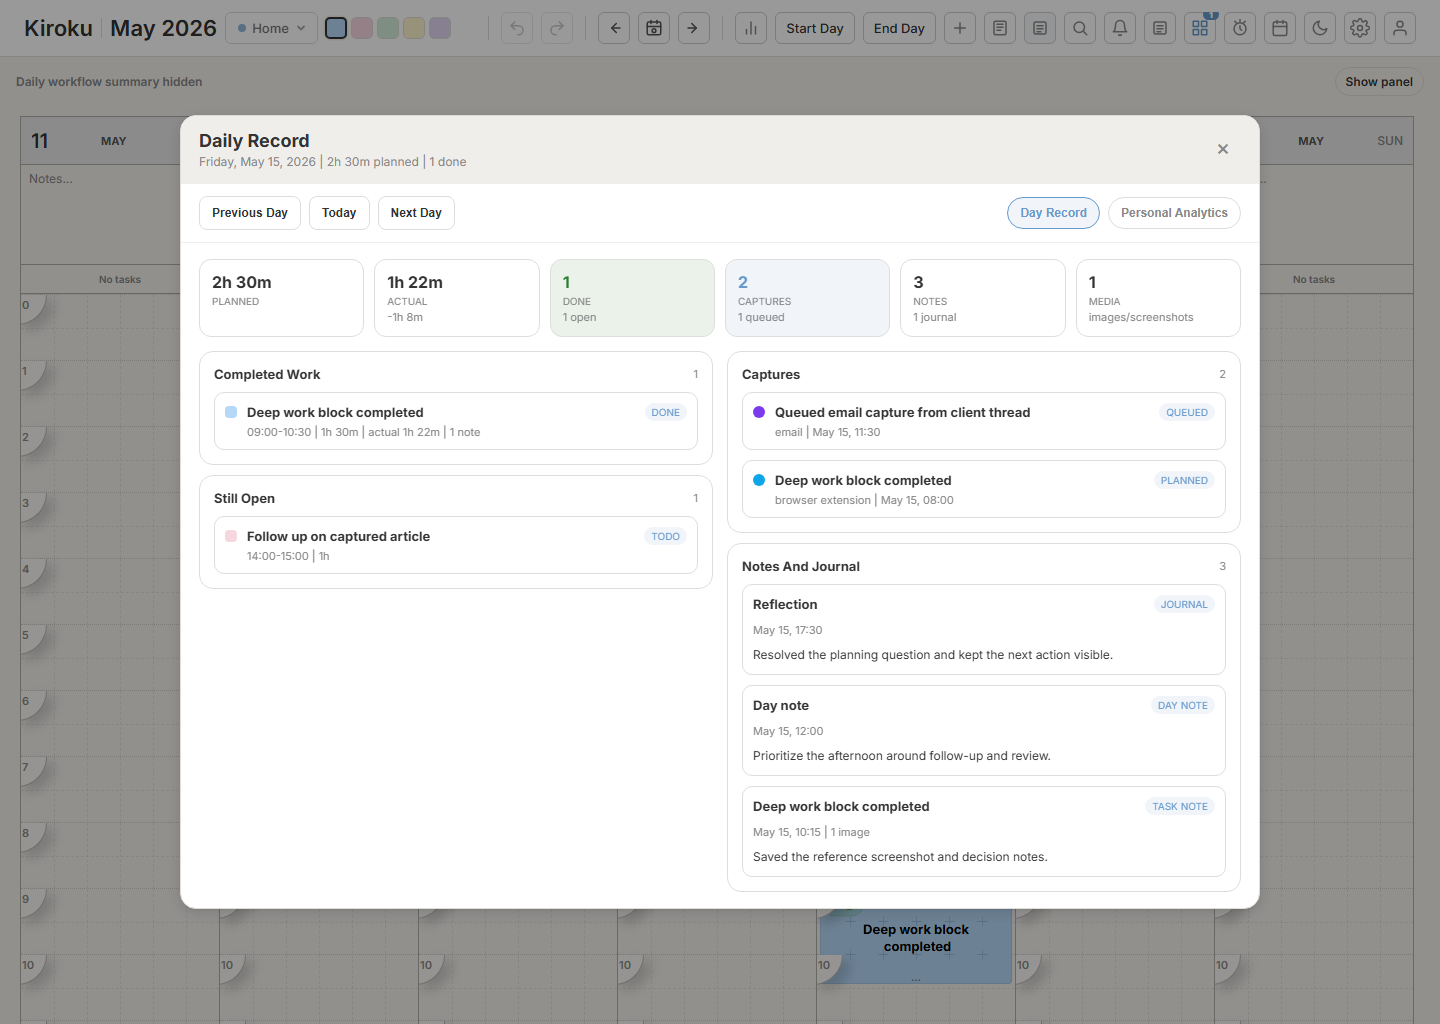
The Day Record tab combines the selected day's scheduled work, completed work, open tasks, alerts, queue captures, day notes, task notes, screenshots, and journal entries. Use Previous Day, Today, and Next Day to move through visible days without leaving the panel.
The Daily Record view includes visible-week history chips, previous/next day and week navigation, and filters for search text, task type, status, source, tasks, captures, notes, screenshots, and journal entries.
The Personal Analytics tab reviews the visible week. It shows planned versus actual time, completion rate, tracking rate, carry-forward work, unplanned captures, completed work, busiest day, top task type, missed work, variance by task type, and estimate feedback from tasks with actual minutes. Missed work can be carried forward to the next configured visible day directly from the review.
The Review Actions tab turns the week review into cleanup work. It can bulk carry unlocked missed tasks forward, plan selected queued captures into the next configured visible day, move missed recurring instances, and apply estimate suggestions to matching open, unlocked tasks. It also includes export controls for the selected day or visible week: print, JSON, CSV, Markdown, and Save weekly review, which creates a normal weekly Journal reflection. These actions update the original task, queue, or journal records, so normal sync and enterprise storage handle them the same way as other planner edits.
The Trends tab reviews recent configured-day weeks. It shows planned-versus-actual trends, capture-to-plan lead time, recurring rollover patterns, completion trends, and estimate feedback.
The History Search tab searches Daily Record history across known tasks, captures, notes, screenshots/media, and journal entries. Use text, content type, and date-range filters to find older daily context without paging week by week.
Use Daily Record when you need to answer "what happened on this day?" Use Personal Analytics when you want to check whether your week plan is realistic.
Use the calendar view
Click the calendar icon in the top bar.
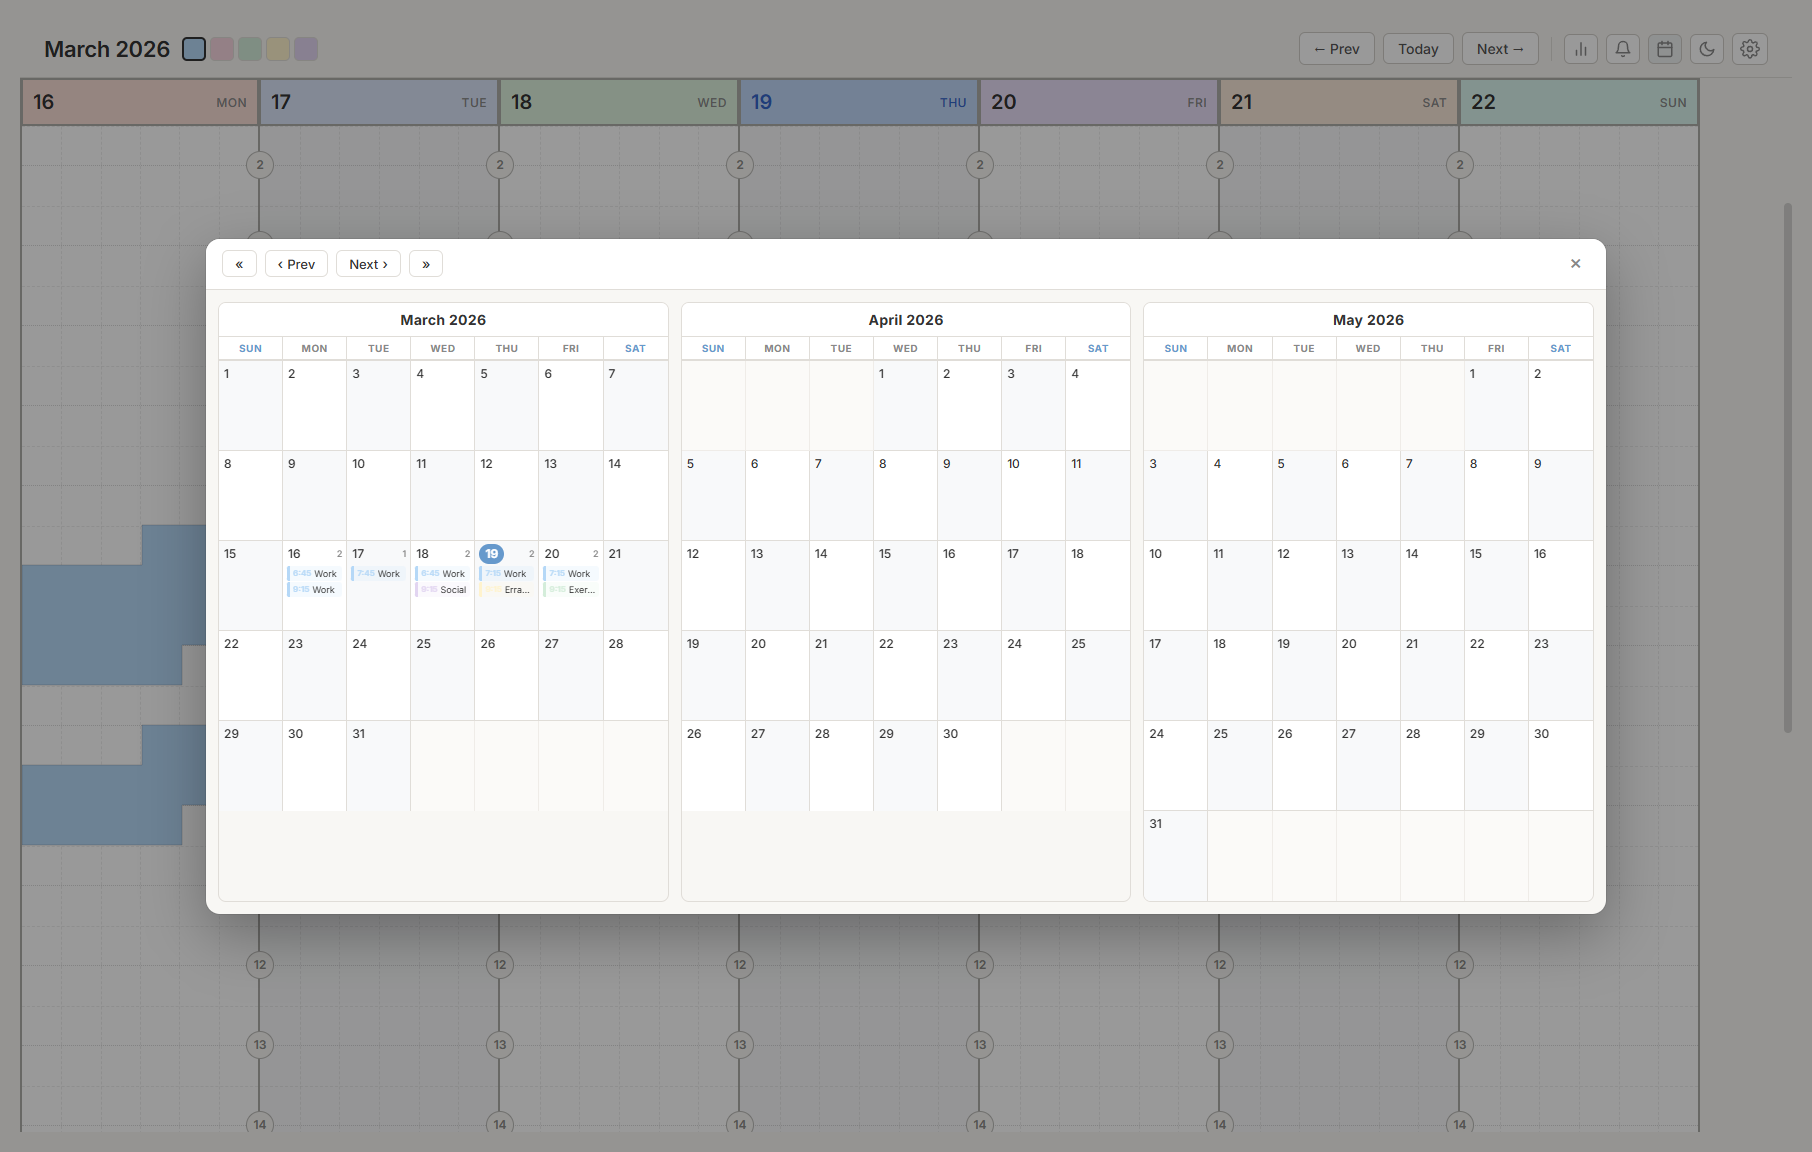
The calendar displays three months at once. Each day shows:
- Colored bars representing tasks (up to 5 visible, with a "+2 more" indicator for additional tasks).
- Holiday names, if holiday countries are configured.
- Background colors matching your column settings.
Click any day to jump to that week in the main view. Today is marked with a colored circle.
To navigate:
- Click « or » to jump 3 months.
- Click ‹ or › to move 1 month.
- Click Today to return to the current month. This button appears only when you have navigated away.
Write day notes
Every day includes a notes area below the header.
- Click the Notes... text area.
- Type your notes.
- Click away or press Tab to save.
Press Escape to discard changes. Day notes also appear in the Daily Summary and Daily Record.
To change the notes font size, go to Settings > Days.
Clear all tasks for a day
- Press and hold the day header (the area showing the day number and name) for 3 seconds.
- A confirmation dialog appears showing how many tasks will be deleted.
- Click Delete all to confirm, or Cancel to dismiss.
Settings
Click the gear icon in the top bar. The Settings panel is split into workspace-specific tabs and shared account/global tabs. Click any tab name to switch to it. Click outside the panel to close it.
Workspaces

Workspaces are separate environments, each with its own tasks, categories, colors, and settings.
Each workspace appears as a card. The active workspace is labeled "Active." Other workspaces show a Switch button.
Do any of the following:
- Rename a workspace. Click the workspace name and type a new name.
- Switch workspaces. Click Switch on any workspace card.
- Delete a workspace. Click the × button. This option appears only when you have more than one workspace. Confirm when prompted.
- Add a workspace. Click + Add Workspace. A new workspace is created with default settings.
When you have multiple workspaces, a dropdown in the top bar lets you switch without opening Settings. A checkmark indicates the active workspace.
Tip: Create separate workspaces for different areas of your life — one for school, one for work, one for personal plans.General
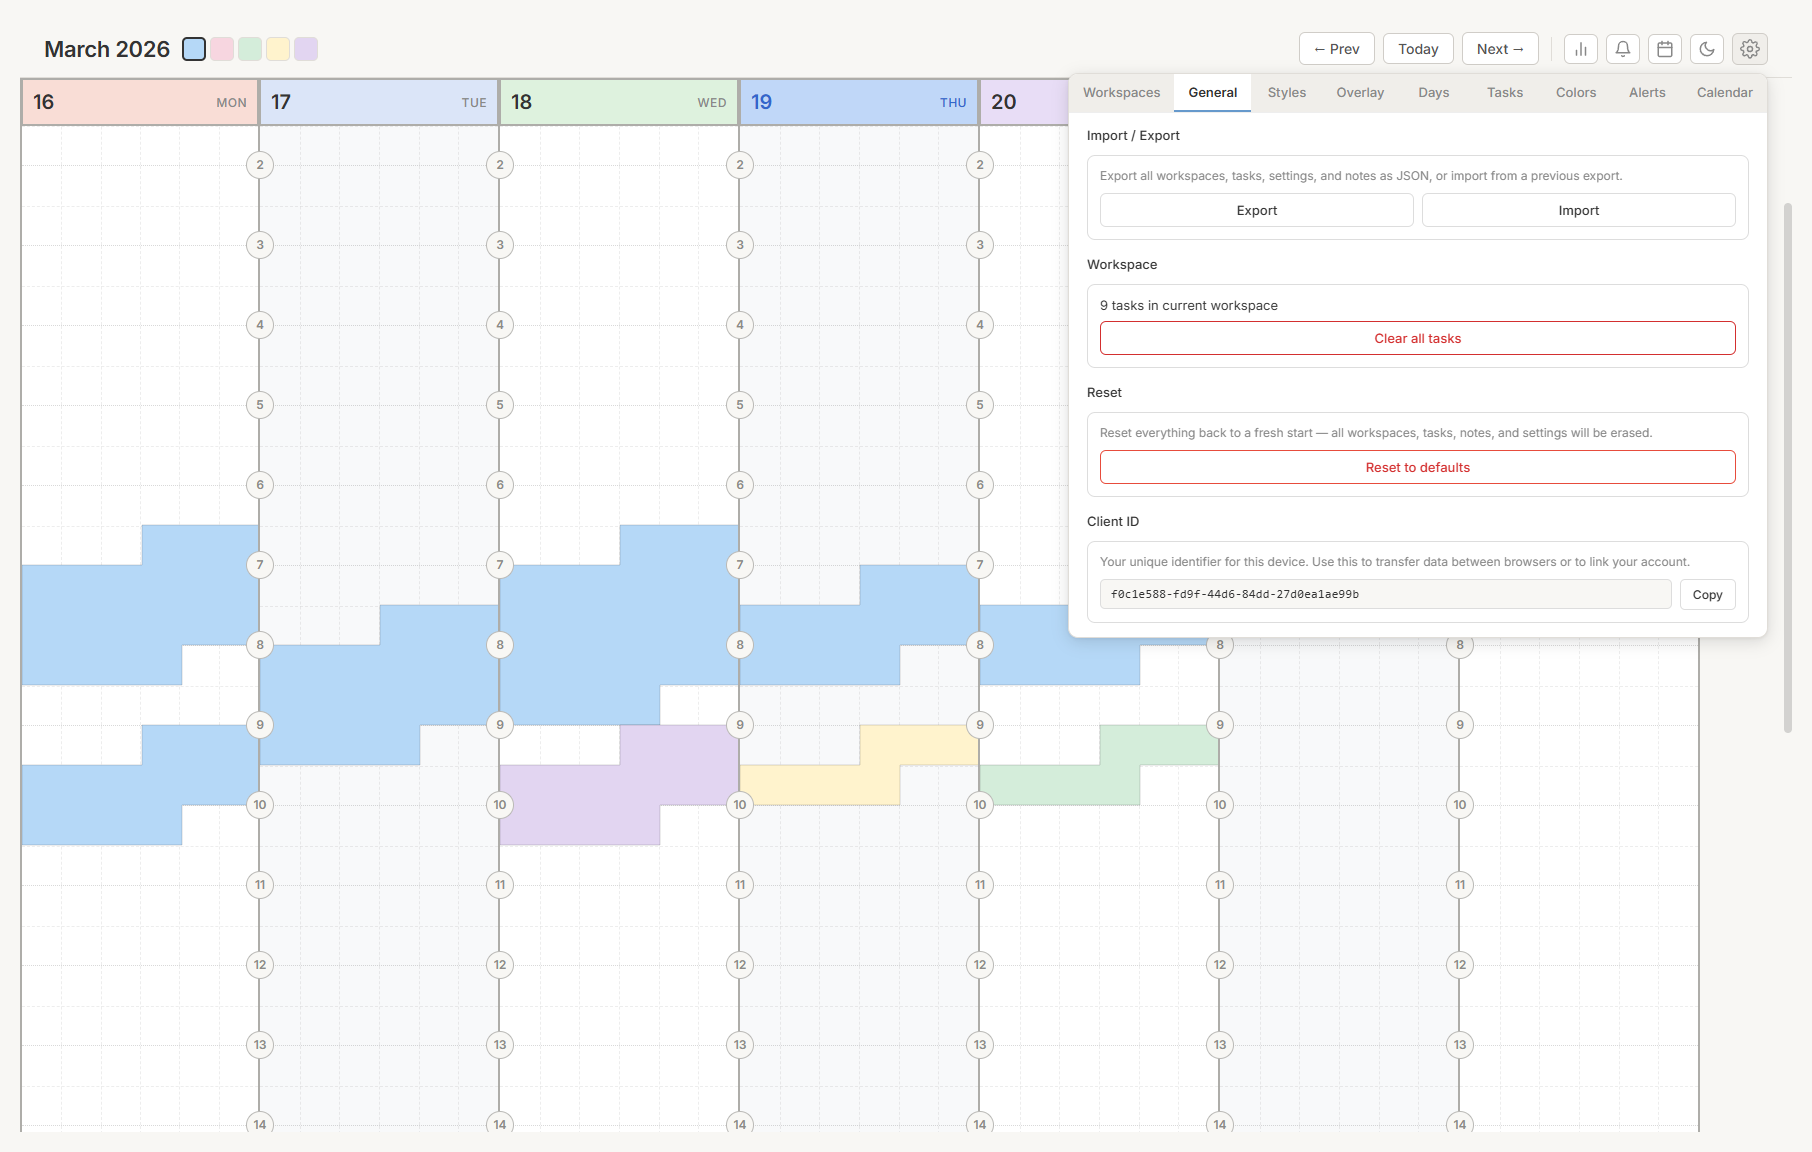
The General tab manages recommended defaults, cloud sync, reset controls, account security, and device/account identifiers. Backups and task imports now live in Settings > Imports. Language, time zone, and smart scheduling controls have their own settings tabs.
Reset to defaults
Erases all workspaces, tasks, notes, and settings and returns the app to its initial state.
Important: This action cannot be undone. Export your data first.Authenticator app MFA
Signed-in password users can enable optional MFA from Settings > General with Google Authenticator, Microsoft Authenticator, 1Password, or another TOTP-compatible app.
- Enter your current password.
- Click Enable Authenticator App.
- Scan the QR code with your authenticator app, or enter the manual setup key.
- Enter the current six-digit code to confirm setup.
- Save the recovery codes shown after setup.
No phone number is required. Recovery codes can be used when the authenticator app is unavailable, and each code works once. You can regenerate recovery codes or disable MFA from the same section by entering your current password plus an authenticator or recovery code.
If you sign in only with Google, turn on 2-Step Verification in your Google Account instead. Kiroku does not ask for a phone number; Google controls the second factor before returning you to Kiroku.
Client ID
A unique identifier for your browser. Click Copy to copy it to your clipboard. This code persists even after a reset.
Imports
The Imports tab manages full backups, queue export, and task imports. Profiles can hide the whole tab or allow only selected task import sources.
Export your data
Click Export to download all workspaces, tasks, settings, and notes as a .tdb file. The file name includes the current date.
The same section also includes a portable task export:
- Queue CSV for unscheduled queue items.
Import data from a backup
- Click Import and select a
.tdbfile. - Review the summary: number of workspaces, number of tasks, and file date.
- Click Import and replace to proceed, or Cancel to dismiss.
Import tasks from another app
Task imports append queue items. They do not replace the whole planner.
- Choose a source under Task imports.
- Paste text or CSV into the import box, or choose a file when the source supports files.
- Click Import pasted text.
Supported task import providers are plain text task lists, generic task CSV, Todoist CSV, TickTick CSV, and Akiflow CSV. Imported task rows are added to the queue with supported metadata such as notes, labels, priority, due date, and estimated minutes.
Culture
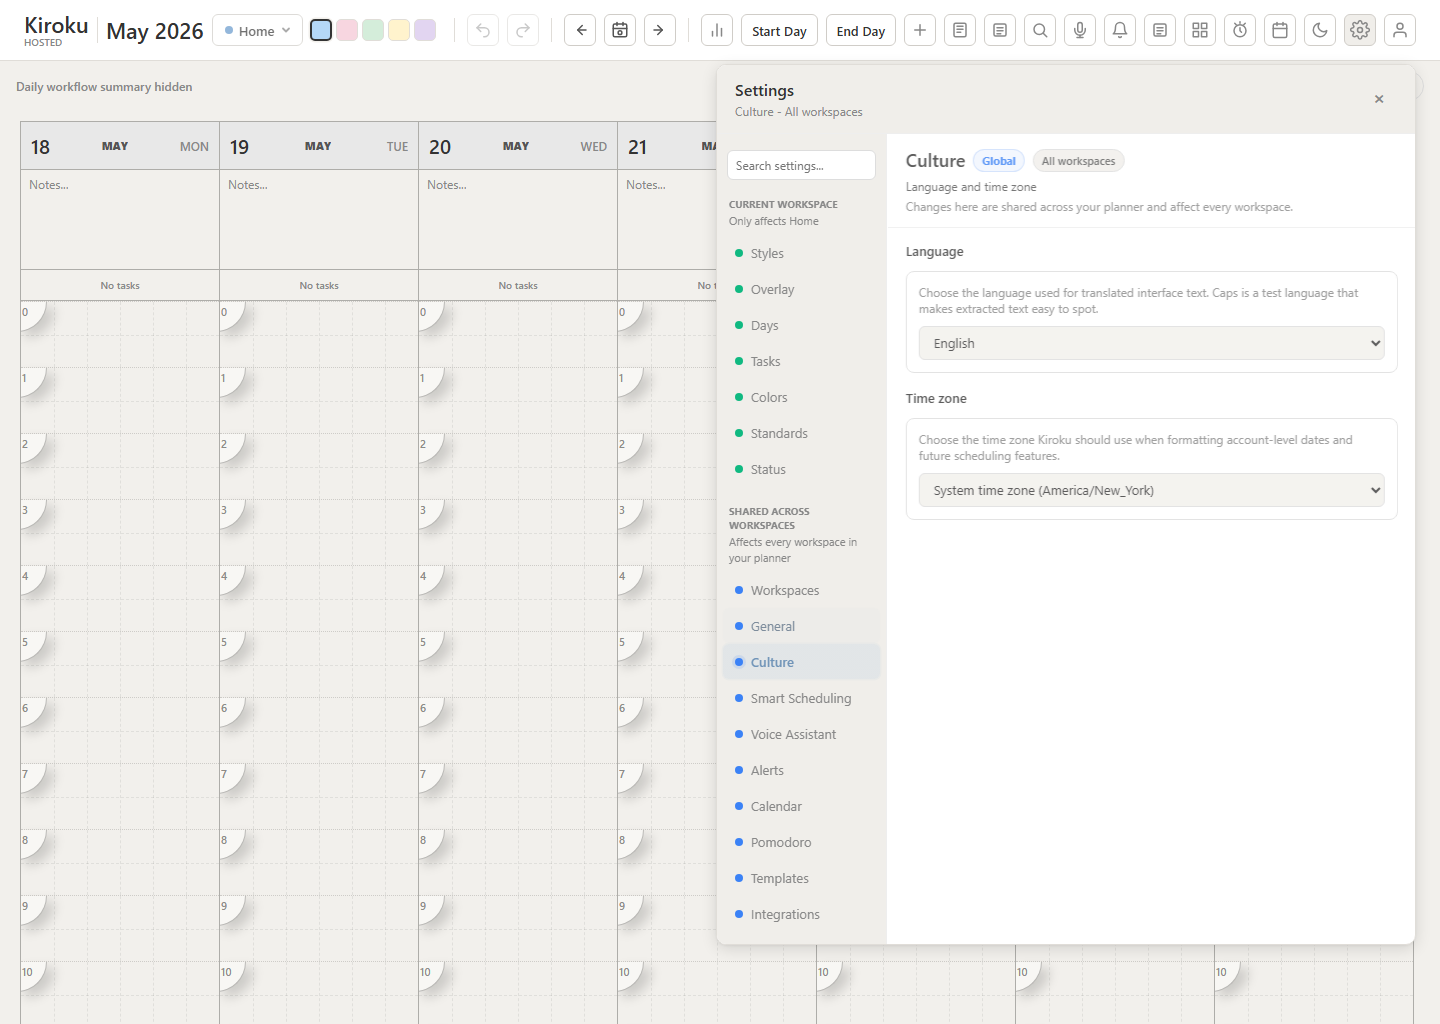
The Culture tab controls how the interface presents language-sensitive content.
- Language. Choose the interface language. Caps is a test language used to reveal untranslated text.
- Time zone. Choose the time zone Kiroku should use for account-level dates and future scheduling features, or keep the browser/system time zone.
Smart Scheduling
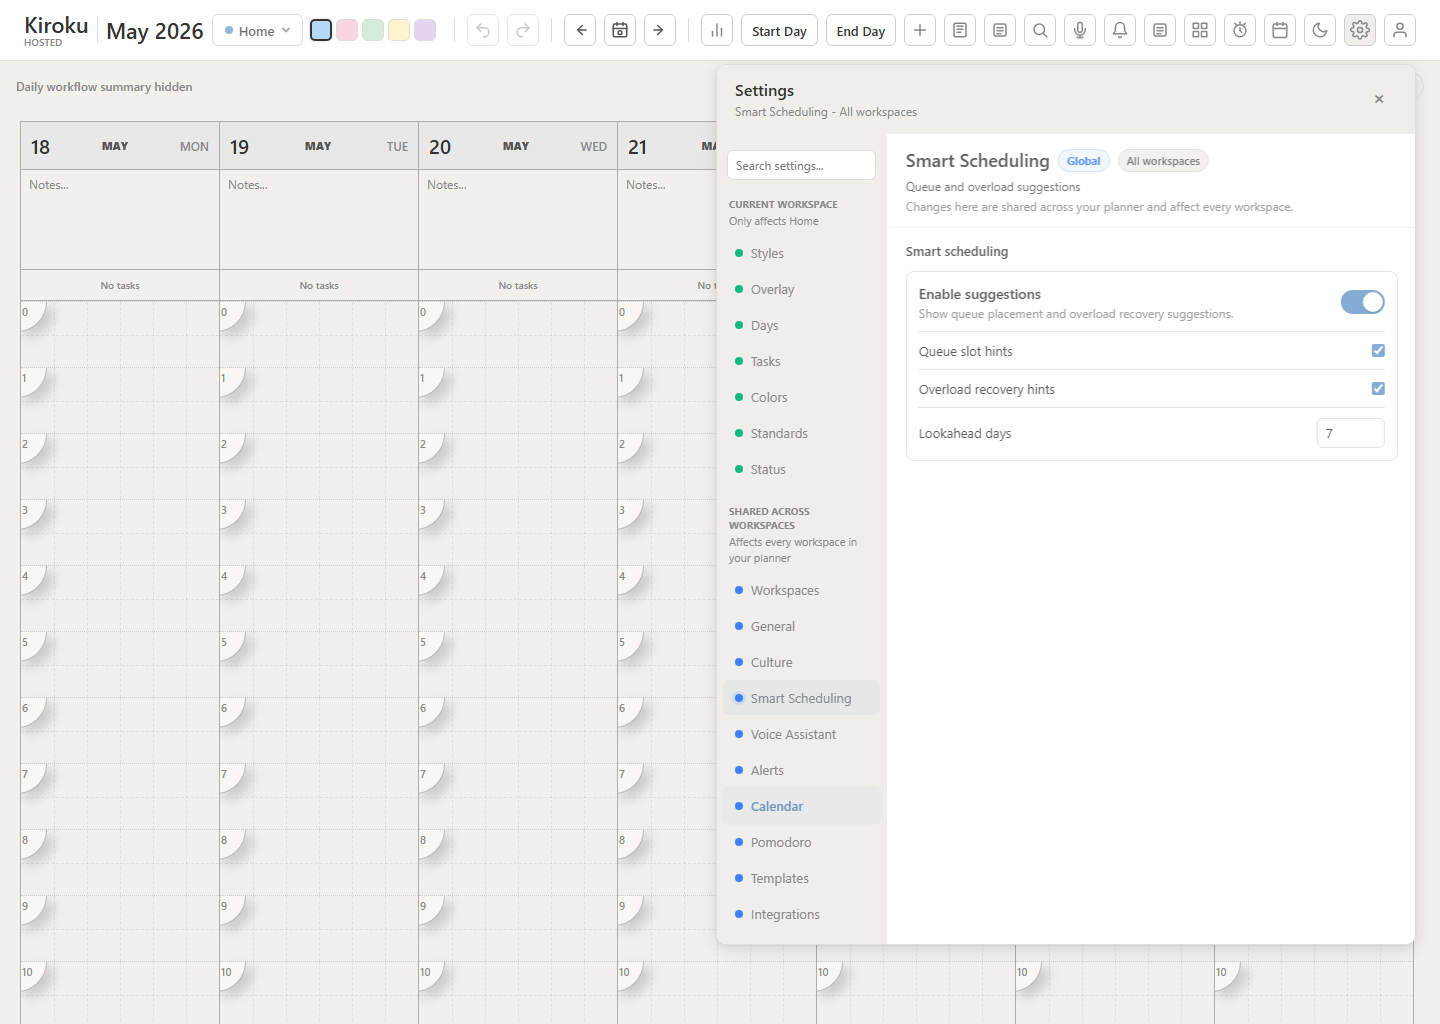
The Smart Scheduling tab controls deterministic schedule suggestions. These settings do not call AI; they use visible days, visible hours, existing tasks, daily capacity, and queue item duration assumptions.
- Enable suggestions. Master switch for queue and workflow scheduling assistance.
- Queue slot hints. Shows suggested slots and powers Plan today / Plan this week from the queue.
- Overload recovery hints. Shows capacity warnings and deferral suggestions in Daily Workflow.
- Lookahead days. Limits how far ahead Kiroku searches for open slots.
Styles
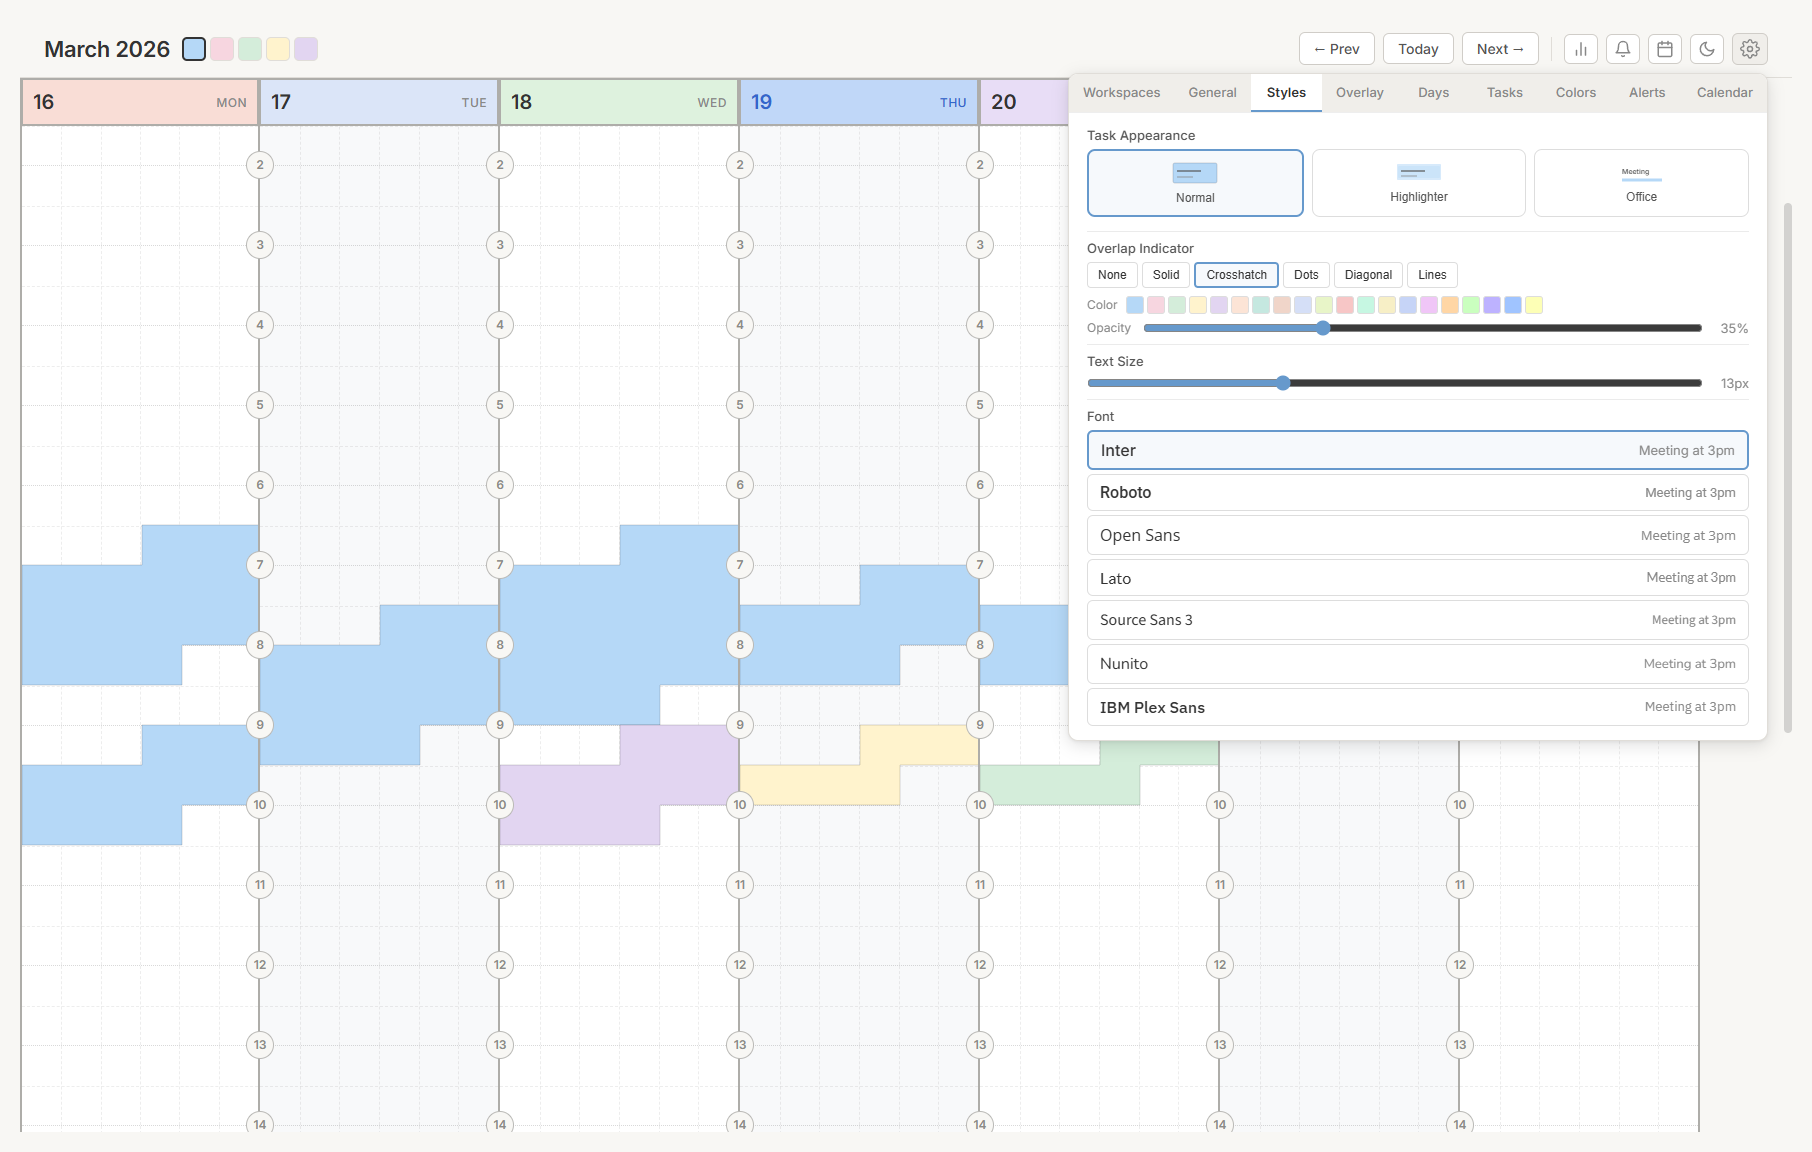
Control how tasks appear on the grid.
Choose a task appearance
Three visual styles are available:
- Normal. Solid colored blocks with clean edges.
- Highlighter. Translucent colors with a slight text tilt, resembling a highlighter pen. Use the opacity slider to adjust transparency.
- Office. A faint colored background with a bold stripe on the left edge, similar to Outlook or Google Calendar. Use the opacity slider to adjust the background intensity.
Set overlap indicators
When tasks overlap, the overlapping area can be marked with a visual pattern.
Choose from: None, Solid, Crosshatch, Dots, Diagonal, or Lines.
For any option other than None, you can also set the pattern color (from your palette) and adjust the opacity.
Adjust text size
Use the slider to set the font size for task text. The range is 8 to 24 pixels. The default is 13. Task text uses the active application theme font.
Overlay
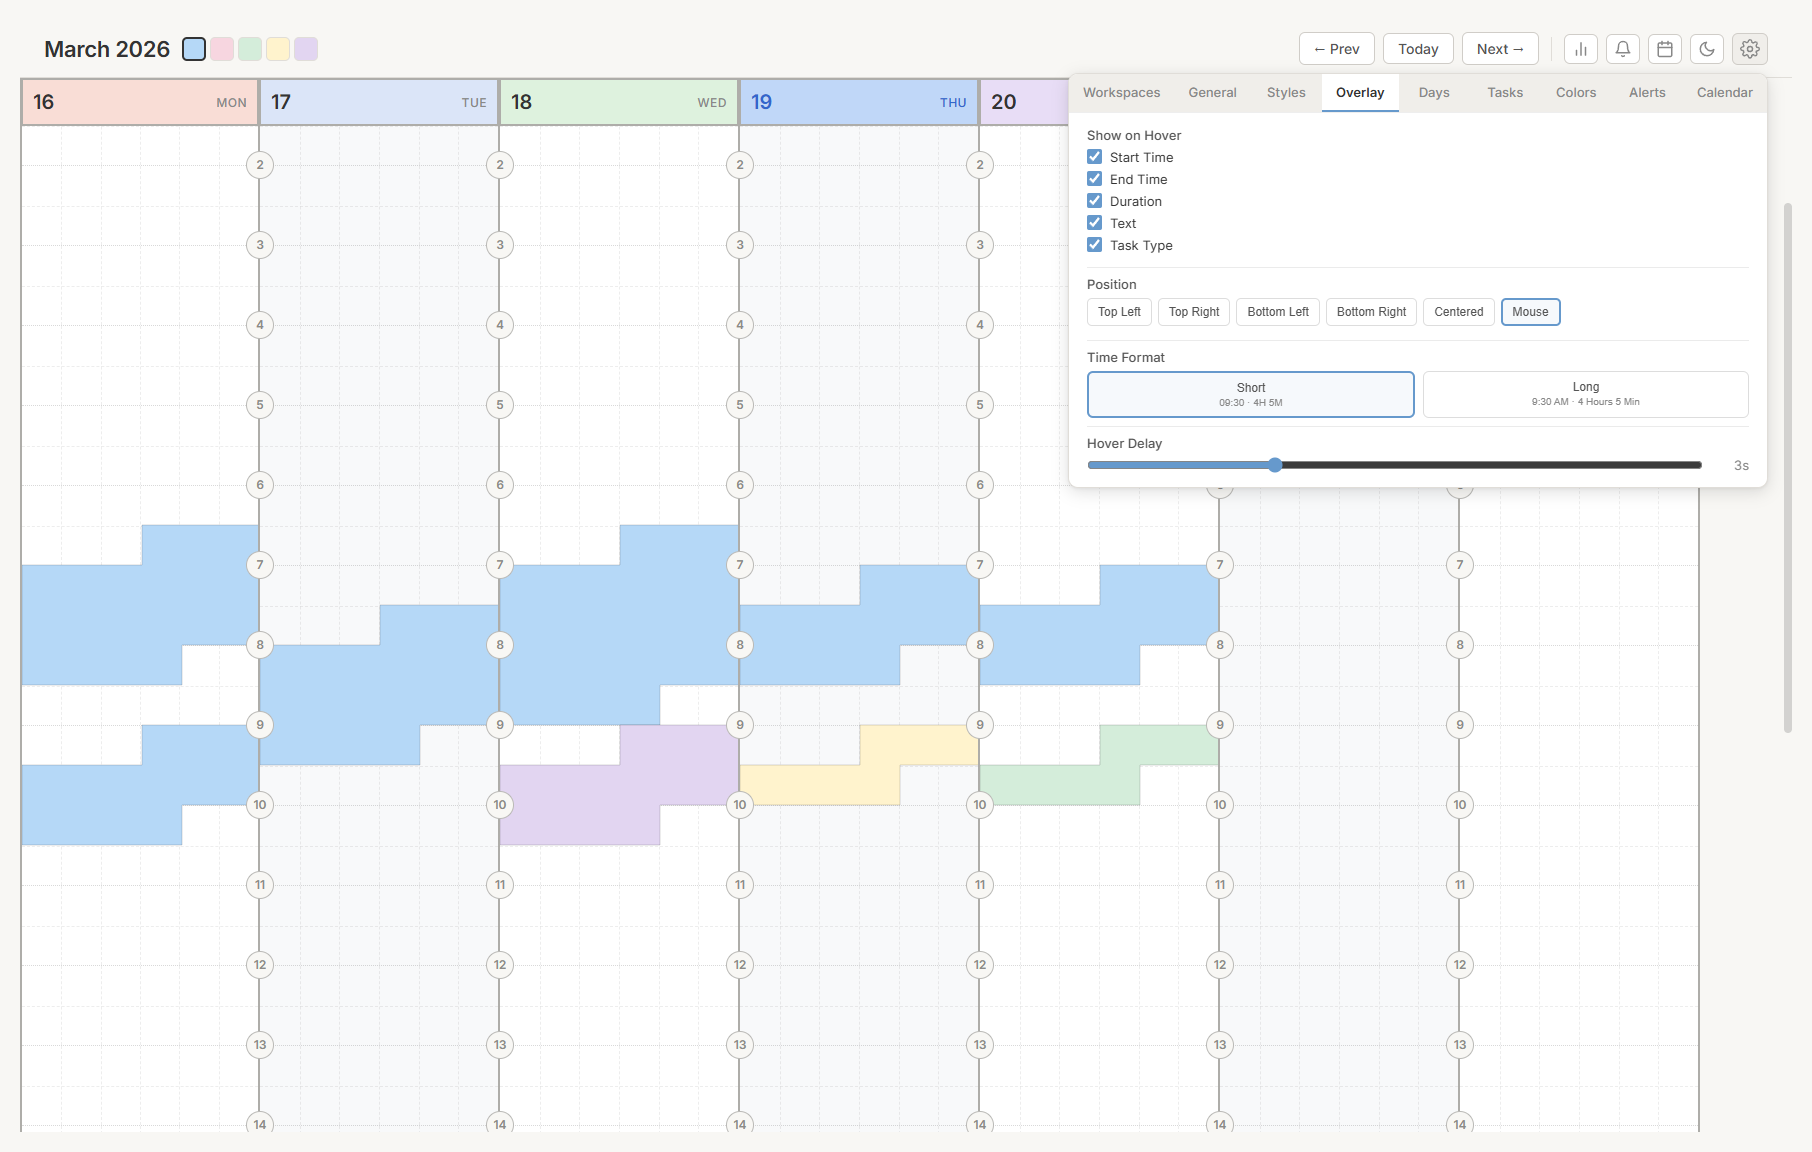
Configure the info overlay that appears when you hover over a task.
Choose which fields to show
Turn on or turn off each field independently:
- Start Time — When the task begins
- End Time — When the task ends
- Duration — How long the task lasts
- Text — The task label
- Task Type — The category name
Set the overlay position
Choose where the overlay appears on screen:
- Top Left, Top Right, Bottom Left, Bottom Right — Fixed in a corner.
- Centered — Fixed in the center of the screen.
- Mouse — Follows the pointer.
Choose a time format
- Short. 24-hour format with abbreviations (such as "09:30 · 4H 5M").
- Long. 12-hour format with full words (such as "9:30 AM · 4 Hours 5 Min").
Set the hover delay
Use the slider to set how long you must hover before the overlay appears. The range is 0 to 10 seconds. Set to 0 for instant display.
Days
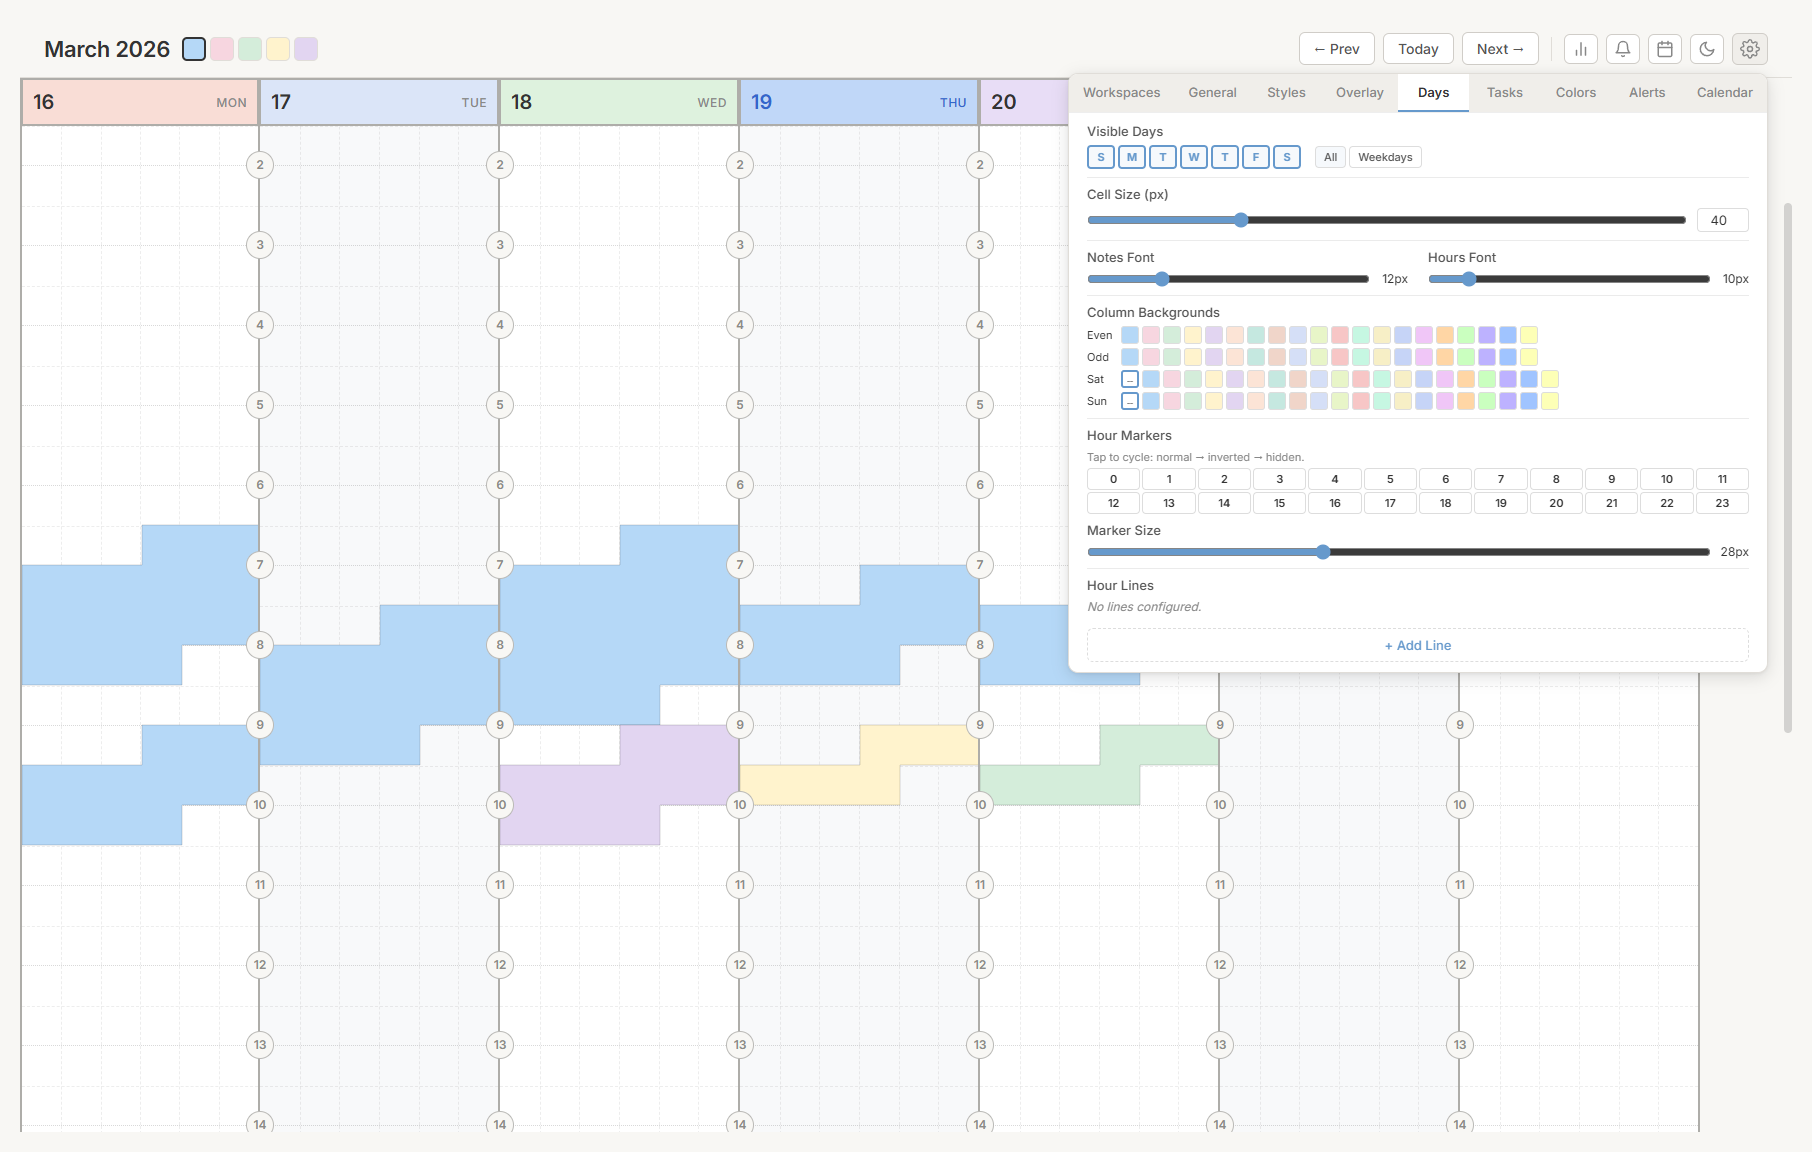
Configure which days are visible and how columns appear.
Choose visible days
Seven buttons represent each day of the week. Click to show or hide individual days. At least one day must remain visible.
Two presets are available:
- All — Show Sunday through Saturday.
- Weekdays — Show Monday through Friday only.
Adjust cell size
Use the slider to set the column width, from 20 to 100 pixels. You can also type an exact value.
Adjust font sizes
Two sliders control text size:
- Notes Font — Font size in the notes area (8 to 24 pixels).
- Hours Font — Font size for the total hours display (8 to 24 pixels).
Set column backgrounds
Set background colors for four column types:
- Even columns — The 1st, 3rd, 5th columns.
- Odd columns — The 2nd, 4th, 6th columns.
- Saturday — A dedicated color for Saturday. Click "--" to follow the even/odd pattern.
- Sunday — A dedicated color for Sunday.
Click any color from your palette to apply it.
Configure hour markers
A grid of 24 buttons (0 through 23) appears in two rows. Click any hour to cycle through Normal, Highlighted, and Hidden states.
Hover over a button to see its current state.
Adjust marker size
Use the slider to set the hour marker size, from 16 to 48 pixels. The default is 28.
Add hour lines
Hour lines are bold horizontal lines that span the grid at specific times.
Each line has:
- A time picker (hour and minute in 5-minute steps).
- Day buttons to choose which days the line appears on. New lines default to Monday through Friday.
- A delete button (×) to remove the line.
Click + Add Line to create a new line.
Tip: Add lines at 9:00 AM, 12:00 PM, and 5:00 PM to mark the start of work, lunch, and end of day.Tasks
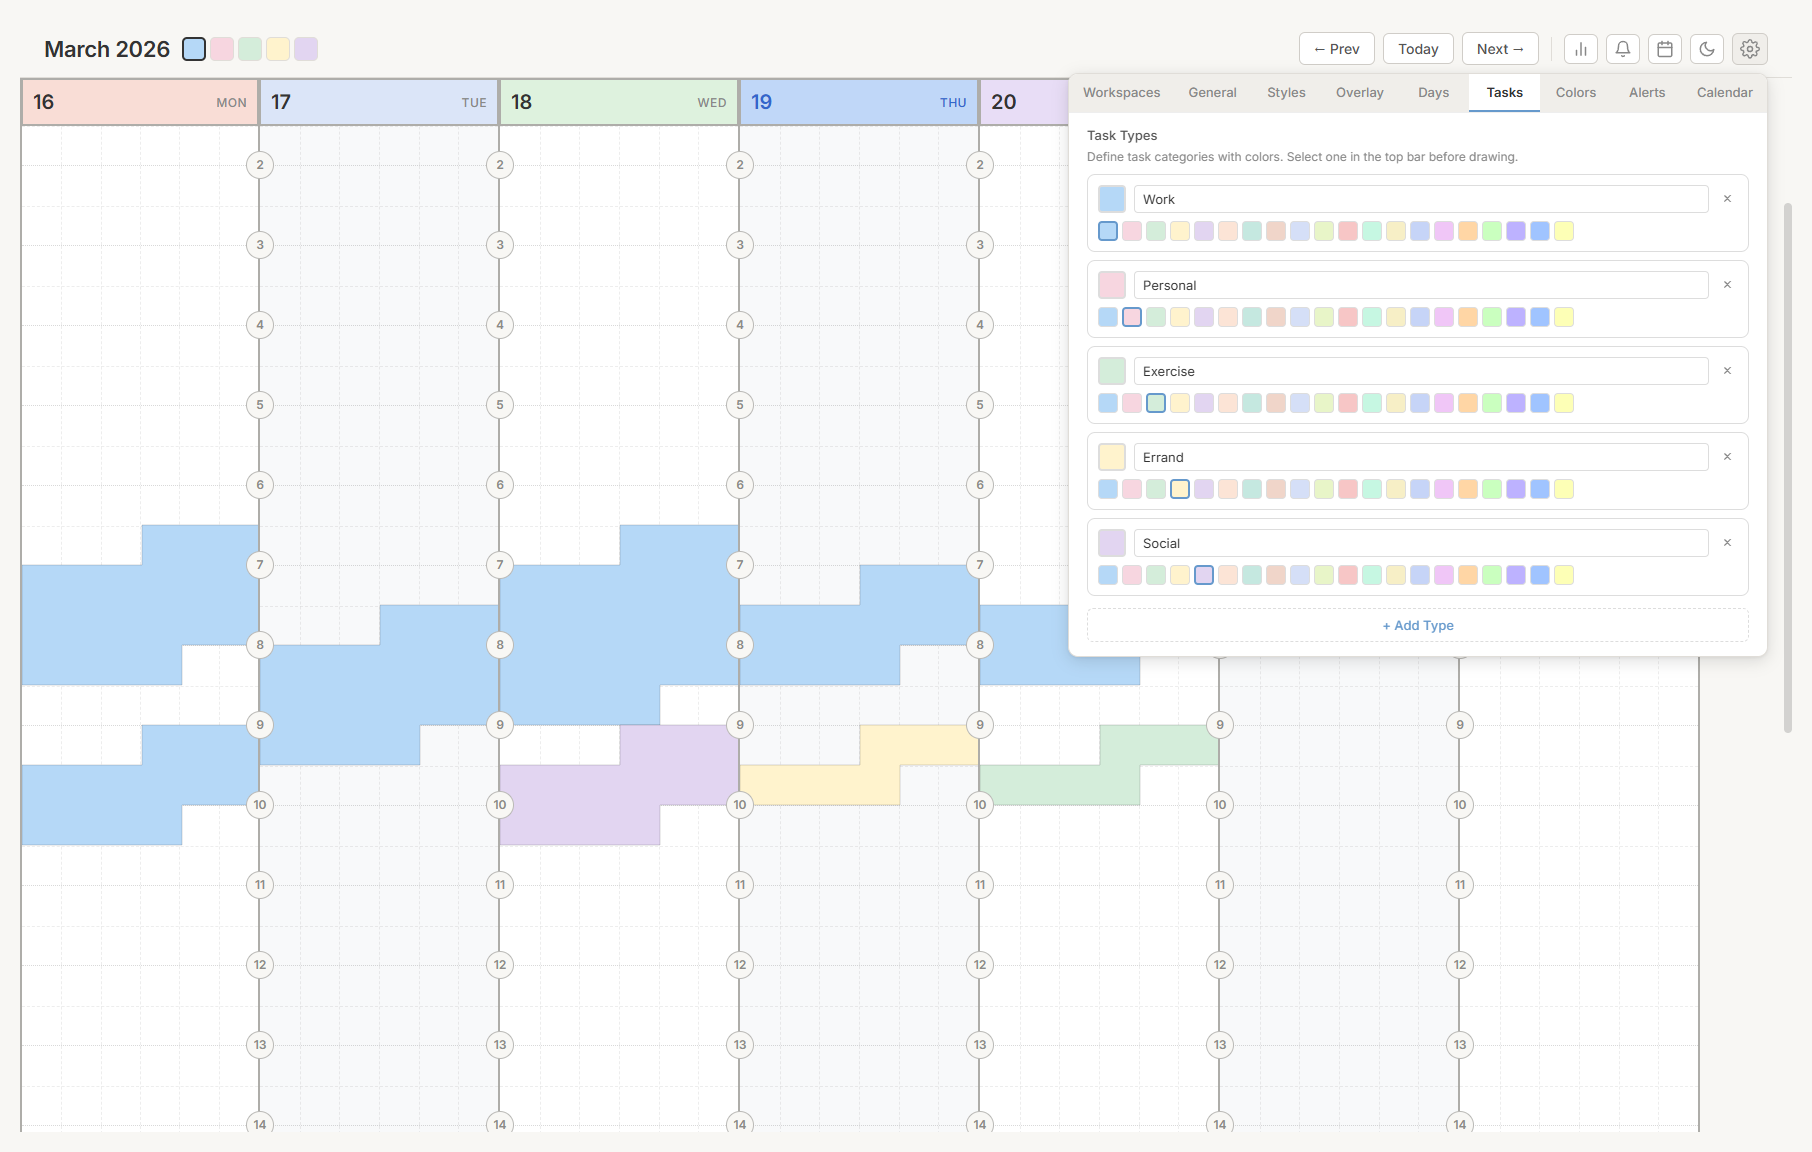
Manage the task type categories that appear as colored buttons in the top bar.
Each task type displays as a card with:
- A colored square showing the current color.
- An editable name field.
- Color swatches from your palette.
- A delete button (×).
Colors
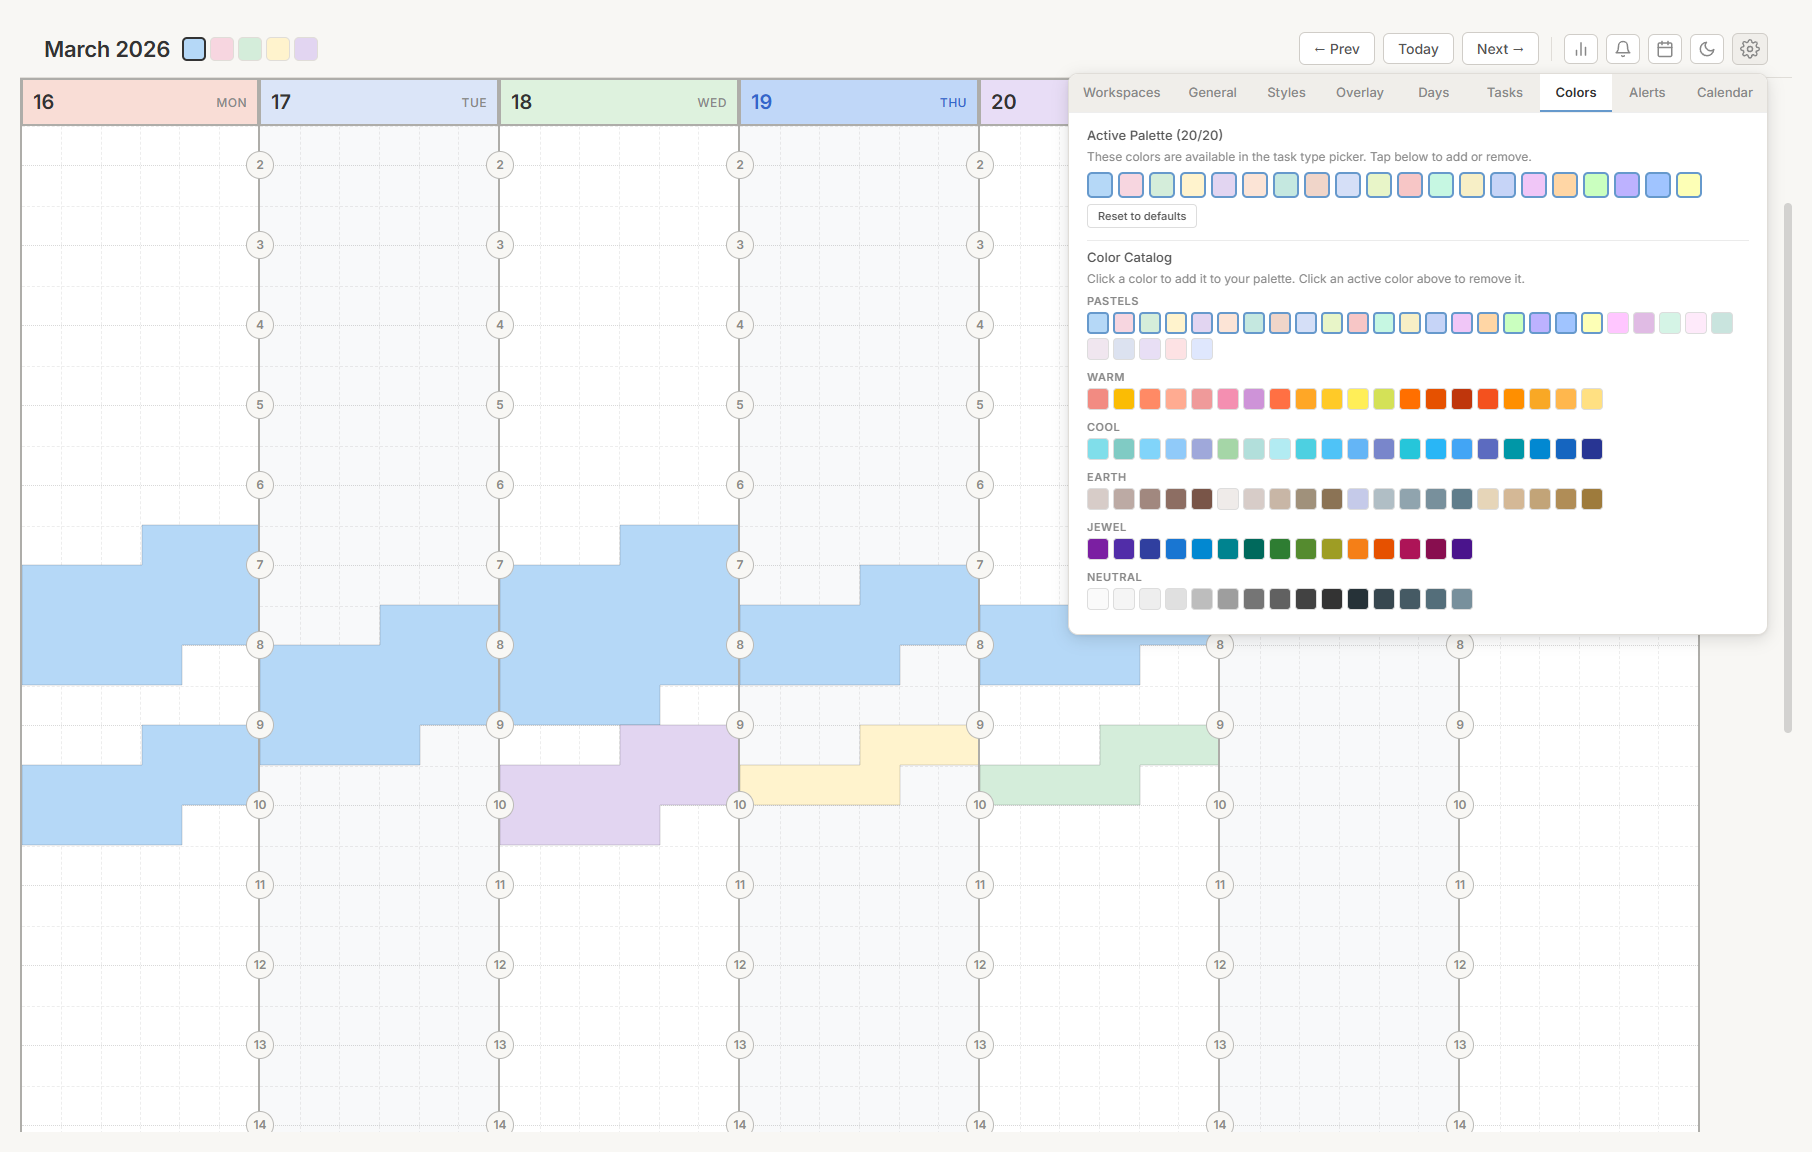
Manage the color palette used throughout the app for task types and backgrounds.
Active palette
Your selected colors appear at the top (up to 20). Click any color to remove it from the palette. At least one color must remain.
Click Reset to defaults to restore the original 20 colors.
Color catalog
A library of 120 colors organized into six groups:
- Pastels (30) — Soft, light tones
- Warm (20) — Reds, oranges, yellows
- Cool (20) — Blues, teals, cyans
- Earth (20) — Browns, tans, olives
- Jewel (15) — Rich, saturated tones
- Neutral (15) — Grays and silvers
Click a color in the catalog to add it to your active palette. Colors already in your palette have a highlighted border. The palette has a maximum of 20 colors.
Alerts
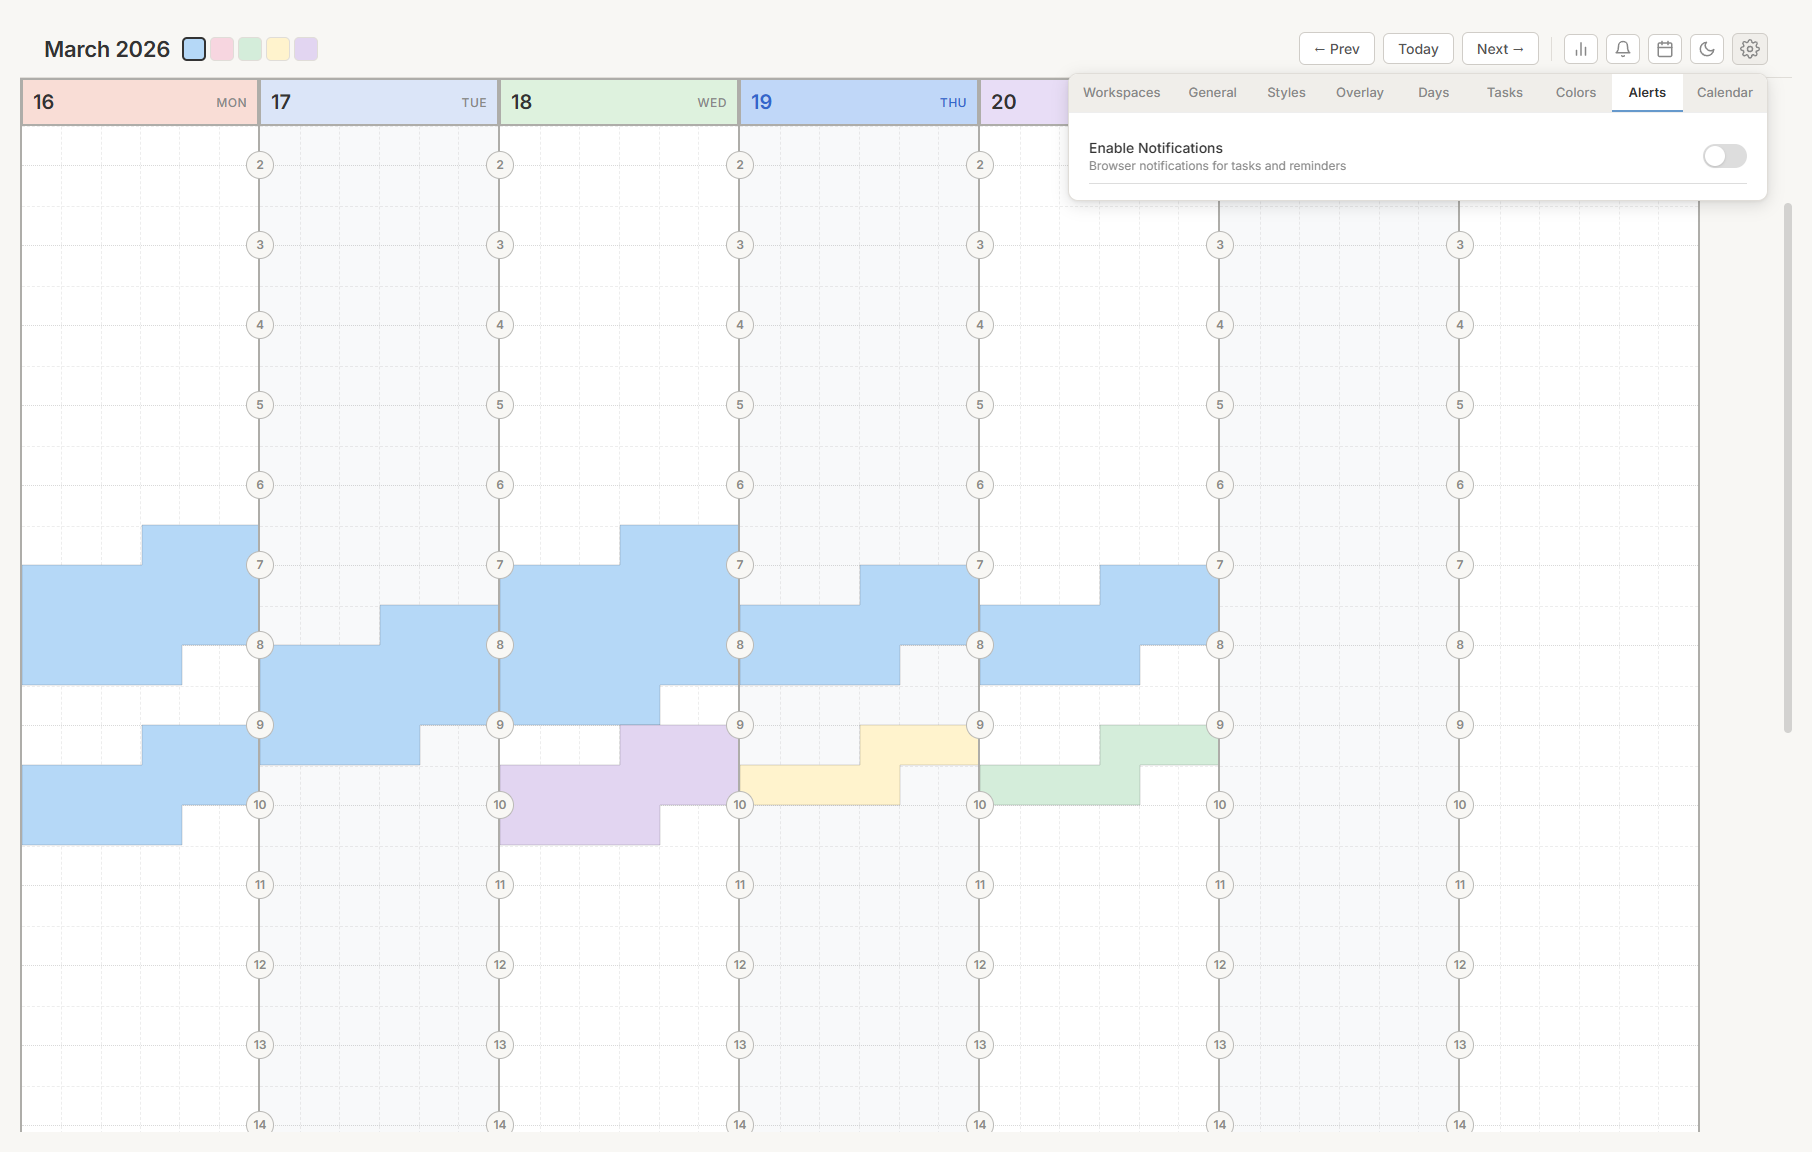
Configure browser notifications for task reminders and daily overviews.
Turn on notifications
Turn on the toggle at the top. Your browser requests permission to send notifications. Click Allow when prompted.
If notifications are blocked, follow the on-screen instructions to update your browser permissions.
Sound
Turn on or turn off the notification sound. Sound is on by default.
Task reminders
Turn on to receive a notification before each task begins. Choose your reminder interval:
1 min · 2 min · 5 min · 10 min · 15 min · 30 minThe selected interval has a highlighted border.
Daily summary notification
Turn on to receive a daily overview of your scheduled tasks. Use the time slider to choose when the notification is sent — from midnight to 11:00 PM. The selected time is displayed next to the slider.
Tip: Set the daily summary to the time you start your day.Calendar
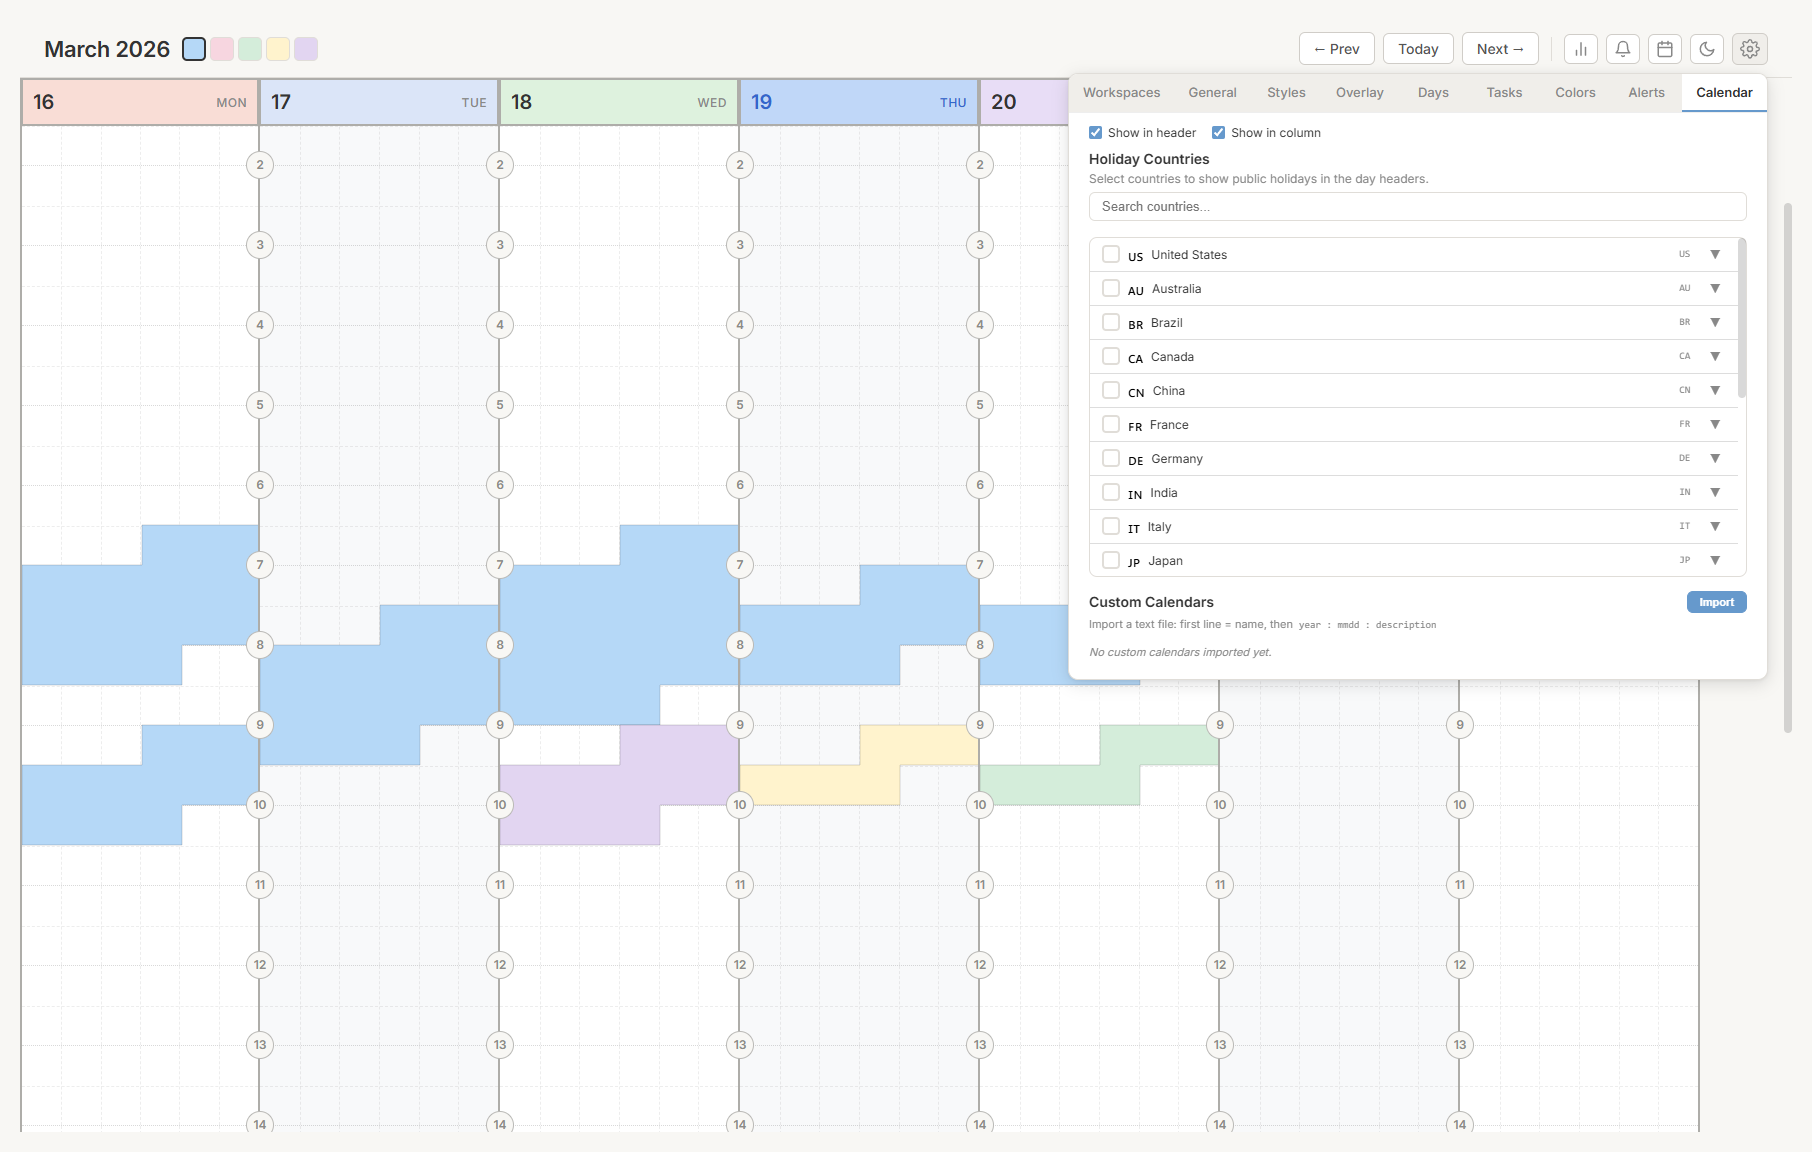
Configure holiday display and custom calendars.
Choose where holidays appear
Two options are available:
- Show in header. Holidays appear in the day header below the day name.
- Show in column. Holidays appear as markers on the grid.
Turn on either or both options.
Select holiday countries
Choose which countries' public holidays to display. Use the search field to filter the list by name or country code.
Each country row shows:
- A checkbox to select or deselect the country.
- The country flag and name.
- The country code (such as "US" or "DE").
- An expand arrow (▼) to view all holidays for the current year.
Selected countries appear as pills above the list. Click × on a pill to remove it.
Import a custom calendar
Import your own dates from a text file.
The file format is:
My School Holidays 2026
2026 : 0101 : New Year's Day
2026 : 0321 : Spring Break Starts
2026 : 0328 : Spring Break Ends
2026 : 1225 : Christmas
The first line is the calendar name. Each subsequent line follows the format: year : mmdd : description (where mmdd is the month and day — 0321 means March 21).
Save the file as .txt and click Import to load it.
After importing, you can:
- Turn on or turn off the calendar with its checkbox.
- Expand (▼) to view all dates.
- Export (↓) to download it as a text file.
- Delete (✕) to remove it.
Integrations
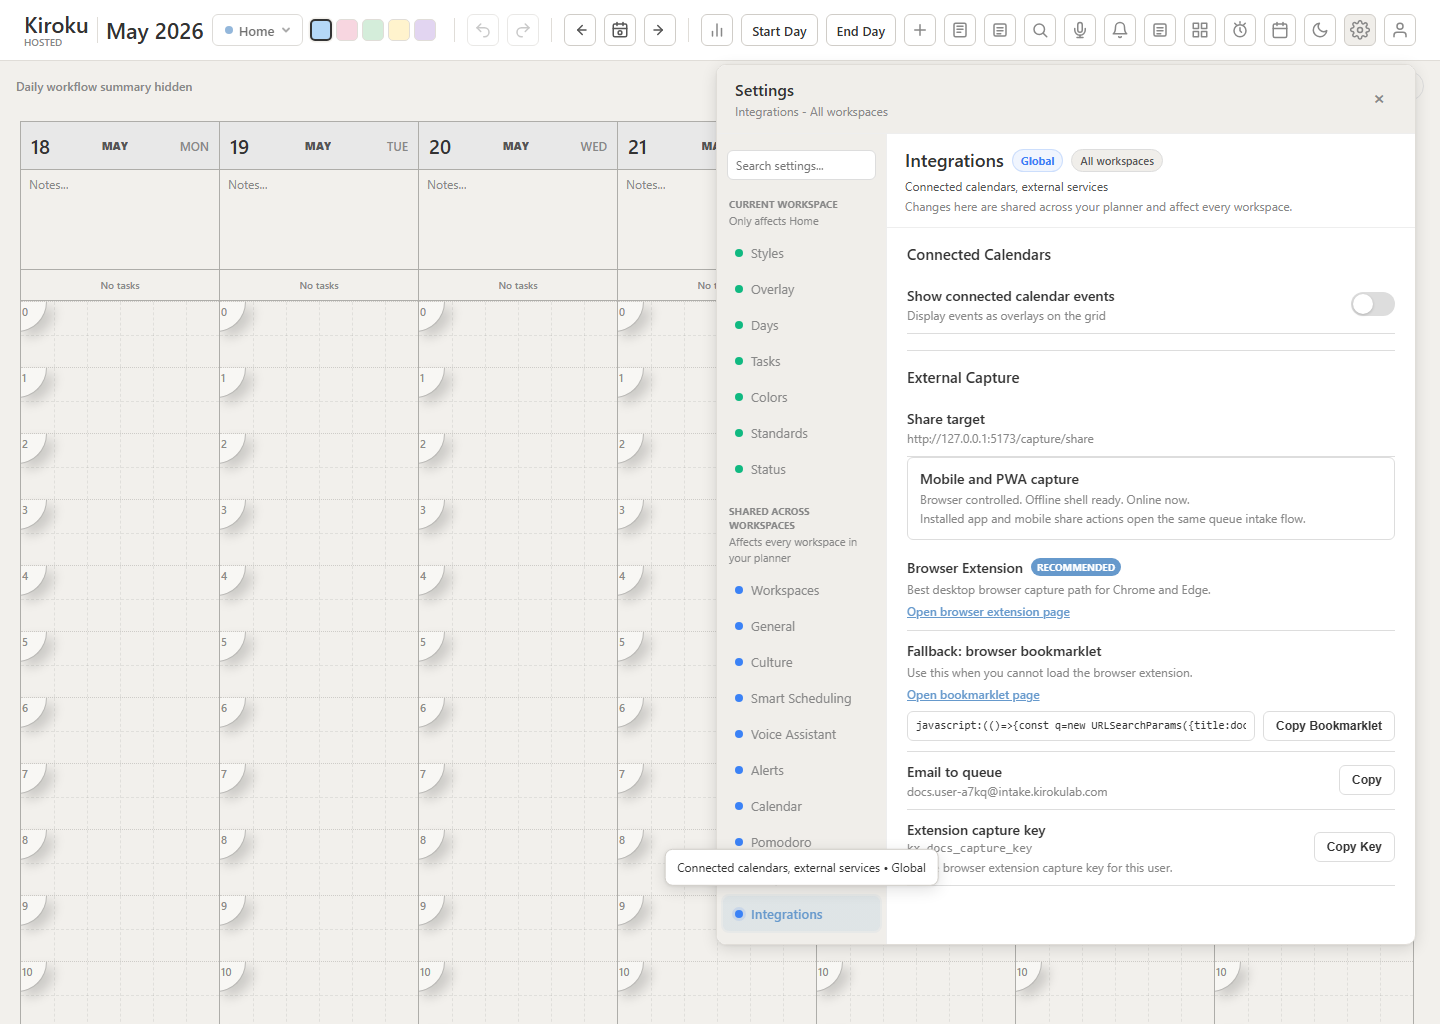
Use Settings > Integrations to connect outside capture paths and calendar services.
External capture options include:
- Connected Calendars. Sign in with Google or Microsoft 365, load calendars, and select which read-only calendars appear as planner overlays.
- Mobile and PWA capture. Shows whether installed-app sharing and offline shell support are ready in the current browser.
- Browser Extension. The recommended Chrome/Edge capture path for pages, links, selected text, and screenshots. Integrations links to the browser extension page and shows the capture key.
- Bookmarklet fallback. A browser bookmarklet for environments where extensions are blocked. Integrations links to the bookmarklet page and shows the generated bookmarklet.
- Email to queue. A stable inbound capture email address. Forward mail to this address to create queue items.
Browser extension captures are accepted into the hosted capture feed, then picked up by Kiroku and added to the queue. After a successful direct extension capture, the popup closes automatically. If the same extension capture is retried with the same idempotency key, Kiroku treats it as already accepted rather than adding a duplicate queue item.
For Postmark inbound email, configure the webhook URL as https://app.kirokulab.com/api/capture/postmark and use Basic Auth with any username and the Kiroku webhook secret as the password.
Pomodoro timer
The built-in Pomodoro timer helps you work in focused intervals. Click the tomato icon in the top bar to open the timer widget.
Start a session
Click Start Focus to begin a focus session. The timer counts down from your configured focus duration (default: 25 minutes). A circular progress ring shows how much time remains.
Controls available during a session:
- Pause. Temporarily stop the countdown. Click Resume to continue.
- Skip. Jump to the next session (break or focus).
- Reset. Return to the initial idle state.
Session cycling
The Pomodoro timer follows a focus/break cycle:
- Focus session — Concentrated work time (default: 25 minutes).
- Short break — A brief rest (default: 5 minutes).
- Repeat steps 1 and 2 for the configured number of sessions per cycle (default: 4).
- Long break — An extended rest after completing the full cycle (default: 15 minutes).
Session dots below the timer show your progress through the current cycle. Completed sessions appear as filled dots.
When a session ends:
- A bell sound plays (if sound is enabled).
- A browser notification appears (if notifications are enabled).
- The browser tab title flashes so you notice even when Kiroku is in the background. The flashing stops when you return to the tab.
The timer uses timestamps rather than interval counting, so it remains accurate even when the browser tab is in the background.
Pomodoro settings
Configure the timer in Settings > Pomodoro:
| Setting | Range | Default |
|---|---|---|
| Focus duration | 5 – 60 min | 25 min |
| Short break | 1 – 15 min | 5 min |
| Long break | 5 – 30 min | 15 min |
| Sessions per cycle | 2 – 6 | 4 |
| Auto-start breaks | On / Off | On |
| Auto-start focus | On / Off | Off |
| Sound | On / Off | On |
| Volume | 0 – 100% | 70% |
| Browser notifications | On / Off | On |
Queue sidebar
The queue is the holding area for work that is not yet scheduled. Use it to capture ideas, to-dos, forwarded messages, and other loose work before deciding when to do it.
Queue items are global. They do not belong to one workspace while they are waiting in the queue. When you schedule a queue item, Kiroku turns it into a task in the workspace currently selected in the top bar.
Click the grid icon in the top bar to open the queue sidebar. It appears on the left side of the screen.
Add items to the queue
- Select a task type by clicking one of the colored chips at the top of the sidebar.
- Type an item name in the text field.
- Press Enter or click + to add it.
The item appears in the queue list with a colored dot indicating its type. A badge in the sidebar header shows the total number of queued items.
Schedule a queue item
Drag any item from the queue list and drop it onto a day column in the grid. The item is removed from the queue and placed as a scheduled task in the selected workspace.
To delete a queue item without scheduling it, click the x button on the item row.
Command palette
The command palette lets you create tasks quickly using natural language, without clicking on the grid.
Open the command palette
Press Ctrl + K to open the command palette. A search bar appears in the center of the screen.
Type a task description with optional time, day, and type information. The palette parses your input in real time and shows a preview of the task it will create, including badges for the task type, day, and time range.
Press Enter or click Create Task to confirm. Press Escape to close without creating anything.
Natural language input
The command palette understands a variety of time and day expressions:
Time expressions:| Example | Interpreted as |
|---|---|
2pm | 2:00 PM |
14:00 | 2:00 PM |
noon | 12:00 PM |
midnight | 12:00 AM |
2pm-3pm | 2:00 PM to 3:00 PM |
2pm to 4pm | 2:00 PM to 4:00 PM |
9am for 1h30m | 9:00 AM to 10:30 AM |
3pm for 45m | 3:00 PM to 3:45 PM |
If you specify a single time without a duration, the task defaults to 30 minutes.
Day expressions:| Example | Interpreted as |
|---|---|
today | The current day |
tomorrow | The next day |
monday (or mon) | The next Monday |
friday (or fri) | The next Friday |
If you specify a time but no day, the task defaults to today.
Combined examples:"Lunch 12pm-1pm today"— Creates a 1-hour task from noon to 1 PM today."Design review 2pm tomorrow for 1h"— Creates a 1-hour task at 2 PM tomorrow."Team standup 9am monday"— Creates a 30-minute task at 9 AM next Monday."Buy groceries"— No time specified, so the item is added to the queue.
Task type tags
Add a # tag to assign a task type:
"Lunch 12pm #personal"— Assigns the Personal task type."Sprint planning 10am #work"— Assigns the Work task type.
The tag is matched against your task type names (case-insensitive). If no tag is specified, the currently selected task type is used.
Voice assistant
When the Voice Assistant feature is enabled for your profile and your browser supports microphone and speech recognition APIs, click the microphone button in the toolbar to start listening for Hey Kiro.
The browser listens locally for the wake phrase. When a final spoken phrase includes "Hey Kiro", Kiroku sends recent microphone audio, the browser transcript hint, and a bounded snapshot of visible planner context to /api/ai/voice-command. The API transcribes the audio, runs the command prompt, normalizes the result, and returns only supported planner commands for the client to apply.
Voice Assistant settings live in Settings > Voice Assistant. Use Microphone sensitivity when you have to speak too loudly for Kiroku to keep detecting speech; the toolbar microphone meter shows live input while listening. If a profile disables ai.voiceAssistant.enabled, the toolbar button and the settings tab are both hidden.
Supported command categories include:
- Create a scheduled task.
- Move a task to another day or time.
- Update a task's start, end, or duration.
- Add a note to a matching task.
- Set status when statuses are enabled for the profile.
- Change task type.
- Lock or unlock a task.
- Duplicate a task to specific or upcoming visible days.
- Delete a matching task.
- Answer read-only schedule and availability questions.
Examples:
- "Hey Kiro, move today's lunch to tomorrow."
- "Hey Kiro, make a task for tomorrow to update documentation, should take 1 hour."
- "Hey Kiro, add a note to my 4 o'clock to call Tim."
Locked tasks remain protected. The voice assistant will not change locked schedule, type, or status fields unless you unlock the task first.
Spoken answers use the browser voice by default. In Settings > Voice Assistant, switch Answer audio engine to Natural AI voice to use OpenAI text-to-speech with the higher-quality OpenAI voices. If that route is unavailable, Kiroku shows an error instead of silently falling back to browser speech.
Hosted deployments need OPENAI_API_KEY or OPENAI_VOICE_API_KEY configured before the route can process audio. Optional overrides are OPENAI_VOICE_COMMAND_MODEL, OPENAI_VOICE_TRANSCRIPTION_MODEL, OPENAI_VOICE_SPEECH_MODEL, and OPENAI_VOICE_AUDIO_MAX_BYTES.
Recurring tasks
Recurring tasks repeat automatically on a schedule. A recurring task appears on every matching day without manual duplication.
Create a recurring task
- Double-click a task to open the task editor.
- Set a recurrence pattern (the recurrence options appear in the editor).
- Save the task.
The task becomes a recurring series. Virtual instances are generated for each matching date and appear on the grid automatically. Recurring tasks display a small repeat icon to distinguish them from one-off tasks.
Recurrence patterns
The following patterns are available:
| Pattern | Description |
|---|---|
| Daily | Every day, or every N days |
| Weekdays | Monday through Friday only |
| Weekly | Same day(s) each week, or every N weeks |
| Biweekly | Every two weeks on the same day(s) |
| Monthly | Same day of the month, or every N months |
Additional options:
- End date. Stop generating instances after a specific date.
- End count. Stop after a specific number of occurrences.
- Days of week. For weekly and biweekly patterns, choose which days to repeat on.
- Day of month. For monthly patterns, choose which day of the month. If the day does not exist in a given month (such as the 31st in February), the last day of the month is used.
Edit or delete instances
When you edit, move, resize, or delete a recurring task, a dialog asks whether you want to change:
- Just this one. Creates an exception for this specific date. The rest of the series is unchanged.
- All occurrences. Updates the master task, which affects all instances in the series.
Excluded dates (deleted instances) are tracked on the series. They will not reappear unless you modify the recurrence rule.
Day templates
Day templates let you save a day's layout and apply it to any other day. This is useful for days that follow a regular pattern, such as a "Focus Day" or "Meeting Day."
Save a template
- Right-click a day header (the area showing the day number and name).
- Select Save as template from the context menu.
- Enter a name for the template.
The template captures all tasks on that day, including their times, types, text, status, lock state, estimates, actuals, deadlines, priority, and scheduling constraints.
Apply a template
- Right-click the header of the day you want to populate.
- Select the template from the context menu.
The template's tasks are added to the target day. Existing tasks on that day are not removed. Locked tasks keep their lock setting when the template is applied, and planning fields are copied onto the recreated tasks.
Manage templates
Go to Settings > Templates to view, rename, or delete saved templates.
Each template card shows:
- The template name (click Rename to change it).
- The number of tasks in the template.
- The date the template was created.
- A Delete button to remove the template.
Cloud sync
When you are signed in with an account, Kiroku syncs your planner data across devices. This includes workspaces, scheduled tasks, queue items, task notes and images, day notes, journals, templates, task types including opacity, settings, status and lock state, recurrence, alerts, and planning fields such as estimates, actuals, deadlines, priority, work spans, and scheduling constraints.
Real-time sync
Kiroku uses Server-Sent Events (SSE) for real-time push notifications between your devices. When you make a change on one device, other devices connected to the same account receive the update automatically within seconds.
If the real-time connection is interrupted, Kiroku falls back to periodic polling (every 2 minutes when the tab is active, every 10 minutes when the tab is in the background). The real-time connection is re-established automatically when possible.
Data is compressed before upload and protected by hash verification. When a conflict is detected (changes on two devices at the same time), you are prompted to choose which version to keep.
Status presets
Task statuses let you track progress on individual tasks. Choose a status preset that matches your workflow, then assign statuses to tasks.
Choose a preset
Go to Settings > Status and select a preset. Five presets are available:
| Preset | Statuses |
|---|---|
| Personal | Not Started, In Progress, Incomplete, Done |
| Agile | Backlog, To Do, In Progress, In Review, Testing, Done, Blocked |
| Workflow | Unassigned, Assigned, In Progress, Info Requested, On Hold, Completed, Expired, Cancelled |
| Kanban | To Do, In Progress, Done |
| Project | Not Started, In Progress, In Review, In Test, Completed, Accepted, Rejected, Reopened, Closed |
In the Agile preset, Backlog is only a task status label. It is separate from Kiroku's queue.
Each status has a default color. You can turn individual statuses on or off using the checkboxes. Only enabled statuses appear as options when editing tasks.
Customize status colors
Click the colored dot next to any status to open a color picker. Choose a color from your palette or the full color catalog.
Click reset next to any status to restore its default color.
A preview at the bottom of the settings panel shows your enabled statuses as colored chips.
Pop-up notifications
When notifications are turned on (in Settings > Alerts), notification banners slide in from the right side of the screen.
- Multiple notifications stack vertically.
- Each notification has a close button (X).
- Click a Daily Summary notification to open the full Daily Summary view.
Keyboard shortcuts
| Shortcut | Action |
|---|---|
| Ctrl + K | Open the command palette |
| Ctrl + scroll | Zoom in or out |
| Double-click a task | Open the task editor |
| Enter | Save changes in the task editor |
| Shift + Enter | Add a new line in the task editor |
| Escape | Cancel and close (editor, notes, command palette) |
| Tab | Save day notes |
| Click an hour marker | Cycle: Normal, Highlighted, Hidden |
| Hold a task (3 seconds) | Delete the task (confirm when prompted) |
| Hold a day header (3 seconds) | Clear all tasks for that day (confirm when prompted) |
| Right-click a day header | Open context menu (save/apply template, clear day) |
| Click outside Settings | Close the Settings panel |
Privacy and data
- Your data stays on your device by default. All data is stored in your browser's IndexedDB storage. Without an account, nothing is sent to any server.
- Cloud sync (optional). When you sign in with an account, your data is encrypted, compressed, and synced to the server. Sync uses hash verification to detect conflicts. See Cloud sync for details.
- OneCode accounts store no personal information. A OneCode account keeps only your code and a password hash — your planner data stays in your browser — and the account is deleted automatically after 14 days without a sign-in. See OneCode accounts.
- Client ID. A unique identifier stored in your browser. It persists across resets and can be used to link your data or transfer it between browsers.
- Back up regularly. Go to Settings > Imports and click Export to save a backup file. Use Import to restore from a backup at any time.
- Browser data affects your tasks. Clearing your browser data removes Kiroku data. Always export before clearing.
- The desktop app stores data locally on your computer using the same approach.